Tuesday, June 30, 2009

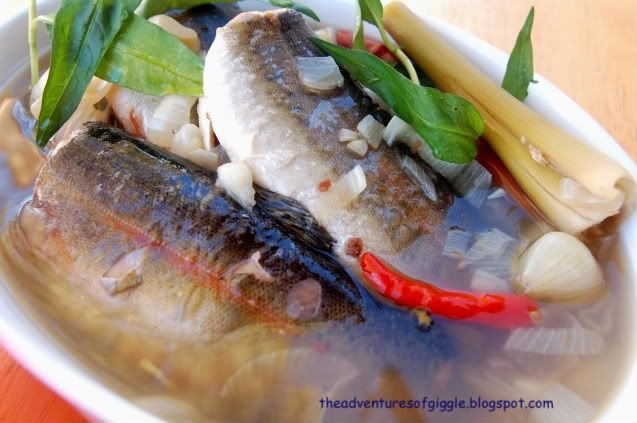
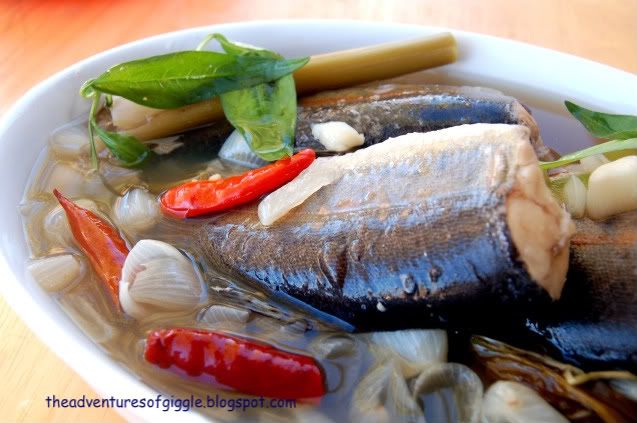
Asam (Tamarind) Fish Soup

Photobucket

The heat of the summer is really cruel, 45C yesterday!!!! Make me almost melt in the air. LOL!!

I was looking for something sour and spicy to open up my appetite. If I were still in Malaysia, I could simply get a bowl of Asam Laksa anywhere. Here, you've got to be hands on for everything. No choice, "tham chiak" - greedy for food - is my character, I would do everything possible I can just to stop my craving. :-p

My friend gave me 2 bags of fresh caught trout from her camping trip, and I immediately thought of making Asam Fish soup, because one of the major factors to make the sou taste good is the freshness of the fish, I couldn't get fresh "kembong" fish here, live Tilapia just cost too much!!

Photobucket

I can get almost every ingredient for Asam Fish here except the tamarind skin and bunga kantan (ginger flower), so, I substituted the tamarind skin with tamarind paste and omitted ginger flower, it tasted good too...yumyum!!!

Tom didn't like it the first time I made this soup for him few years ago, it was too fishy for him because he is from Ohio, middle part of the states, never had a chance to eat seafood until he was 34 years old. Now -- he loves it. Yay!!!

Here's my recipe and steps, the spiciness and sourness are adjustable according to personal desire.

1. 300g fresh trout (body about 5~6" long) - (use "kembong" fish it it is available)
2. 900~1000ml water.
3. 1 bunch (about 50g) "kesom" leaf (some people call it Vietnamese coriender or Vietnamese Cilantro) - can be easily found in Asian supermarket here.
4. 25~30 pearl onion (small onion) coarsely sliced.
5. 6~8 dried chili - unseeded.
6. 2~3 frese chili padi - smashed.
7. 1 tsp of tamarind paste - or as desired.
8. 1/2 tsp pre-fried belancan.
9. 1~2 tsp fish sauce - optional.
10. Salt to taste.

Steps :

1. Boil the water, add in ingredients #3~6.
2. Return to boil, simmer for about 30 minutes.
3. Add in tamarind paste and belacan, simmer for another 10 minutes.
4. Add in fishes, fish sauce. Return to boil and cook until the fishes are done. (Don't over cook the fishes for best texture.
5. Salt to taste.
6. Serve warm.

"Kesom" Leaf

Photobucket

Sunday, June 28, 2009

Blueberry Scones Recipe

Photobucket
Want something different for Sunday breakfast or high tea? Here's blueberry scones!!

Normally, I don't have to worry about what to eat for breakfast, Tom will fix it for us, bacon, omelet, over easy egg, muffins, orange.. etc. I have no complaint about that, he is our breakfast guy. LOL!!

Photobucket

Of course, I will make something different once a while, like Onion Bacon Quiche, banana muffins, bacon onion roll, and here they are - blueberry scones. They are best served with any fruit jam (I preferred mixed berry - I will post my home made mixed berry jam later), butter and honey!

Photobucket


It is a very simple and fast baking. Here's my recipe and steps, ENJOY!
Photobucket


Ingredients :

1. 1/2 stick frozen unsalted butter - coarsely grated (should be approx. 1/4cup) - keep in refrigerator until needed.
2. 1 cup all purpose flour
3. 1/2 tsp baking powder
4. 1/8 tsp baking soda
5. 1/4 cup brown sugar
6. 1/8 tsp salt
7. 1/4 cup sour cream (can substitute with 3 tbsp butter milk if sour cream is not available)
8. 1 egg
9. 2/3 cup fresh blueberry (or as needed) - if using frozen blueberry - DO NOT defrost.

Steps :

1. Preheat the oven to 400F.
2. Sieve the flour, baking powder and baking soda together.
3. Add sugar, salt and butter into the flour mixture, toss with folk to form fine crumbs or rub with your fingers.
4. In a separate bowl, whisk together the egg and sour cream/butter milk.
5. Fold in egg mixture into the crumbs with a rubber spatula.
6. Turn the dough on a floured surface, knead it very lightly for 15 seconds until it is well combined - DO NOT over knead. (The dough should be soft and moist).
7. Add in blueberries, lightly rub into the dough to mix well.
8. Divide the dough to 8~10 portion. lightly flatten it with your fingers.
9. Place them on a un-greased baking sheet.
10. Bake on the middle rack in the preheated oven for 15~17 minutes.
11. Serve warm with any fruit jam or butter.

Wednesday, June 24, 2009

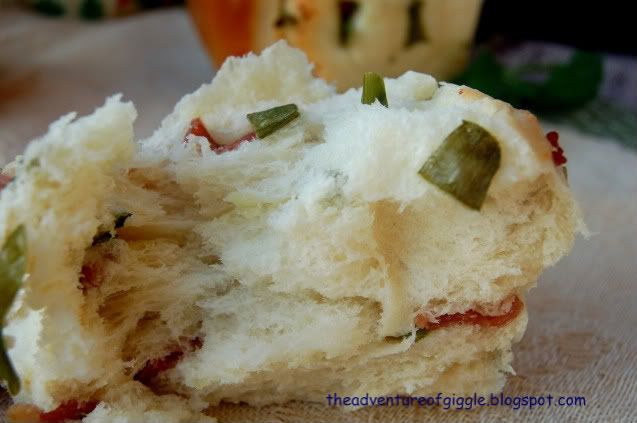
Bacon Onion Roll and Parmesan Oregano Bread Stick

Photobucket
You really need to try this out, soft and yummy!!

I wanted to bake some bread a long time ago, but always gave up because afraid of the kneading process. It is really time consuming. I will get a bread maker one day!

Photobucket
Parmesan Oregano Bread Stick

It is summer time, which is good temperature to let the bread rise. Today I felt in a good mood to bake some bread, so I quickly gathered all the ingredients and started to work on it.

Photobucket

This time, I used a different recipe. I split the dough for bacon onion roll and Parmesan oregano bread sticks - both turned out great, soft and yummy. Just feel like eating Pizza Hut or Dominos bread stick, love it!!!

Photobucket

Dough recipe :

A)
1. 150g all purpose flour
2. 450g bread flour
3. 20g low fat powder milk
4. 70g sugar
5. 10g salt
6. 4 tsp yeast
7. 300ml water
8. 1 egg

B)
1. 60g unsalted butter

Method :
1. Mix all the ingredients in A in a large mixing bowl. Use your hand to form a lumpy dough.
2. Turn the lumpy dough to your work surface and start to knead.
3. Knead until the dough is smooth and not grainy nor rough. It should feel smooth in your hands. It takes about 15 minutes or longer, depending how you knead it.
4. When the dough is satin smooth, add in the butter. Knead it well to let the butter incorporate fully into the dough.
5. Knead until it is non sticky (30 mins).
6. Stretch a little of the dough, it should not tear off easily and it feels like stretching a thin layer and looks translucent against the light.
7. Once the texture is reached, form it into a ball, leave it in a large greased stainless steel bowl cover with plastic wrap.
8. Put it in a warm place and proof for about an hour or a little more. It should double or triple in size.
9. Remove the dough, punch down to deflate gas inside.
10. Divide it into 2 balls. Let it rest for a further 10 minutes in the bowl, covered.

Photobucket


For Onion Bacon Roll
- 1/3 cup chopped onion
- 4 slices cooked bacon - crumbed
- some oregano flakes
- some garlic powder
- some salt
- some black pepper
- some parmesan cheese
>> mix all ingredients except parmesan cheese<< - egg white mix with some fresh milk for brushing. 1. Roll the dough into a rectangle piece, sprinkle the onion bacon mixture in the center part. 2. Sprinkle some parmesan cheese on top of it. 3. Roll it up like a swiss roll and fold down the two ends below. 4. Rest for another 45 minutes, cover with plastic wrap. 5. Brush the egg white mixture on top of them. 6. Bake for 12 minutes at Preheated the oven at 325F. Then turn to 350F to brown the surface for 2 minutes Photobucket
Texture of the roll


For Parmesan Oregano bread stick
- butter
- some oregano flakes
- garlic powder
- parmesan cheese
- salt

Photobucket

1. Roll the dough into a rectangle piece (about 1/3" thick,will rise thicker later).
2. Use the pizza cutter to cut 1.5" strips (widthwise)
3.
Rest for another 45 minutes, cover with plastic wrap.
4. Brush some butter on the surface.
5. Sprinkle oregano flakes, garlic powder, pinch of salt, parmesan cheese on top of it.
6. Bake for 13 minutes in preheated oven at 325F, turn to 350F for 2 minutes to brown the surface.

Friday, June 19, 2009

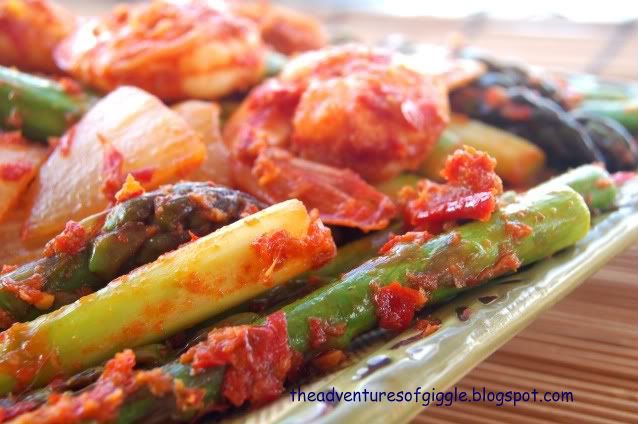
Stir Fried Asparagus with Sambal Prawn

Photobucket
Another common dish in the "chu char" and seafood restaurants in Malaysia. I was convinced that asparagus is only good when used in stir fry with sambal prawn.

The western restaurants here normally serve grilled asparagus. When I first came to US, I was hesitant to try it as I didn't know how asparagus tasted without chili. When I volunteered at Tzu Chi, I got the chance to know that it can be cooked together with egg too. They actually taste good off the grill or stir fried with scrambled egg.

Stir Fried Asparagus with Sambal Prawn

However, I like is stir fry asparagus with sample prawn most. I never cooked this in US before I brought my bullet blender (US version in this link - we got the one in from Malaysia with the juice attachment you can't get in the US, but it is almost the same) from Malaysia, because I was too lazy to pound the chili and the blender I got from the shop here does not cater to smaller capacity.

Photobucket


Tom is now doing better to handle belacan now! LOL!

Here's my recipe :

1. 350g tender asparagus - cut to approx. 3~4" strips.
2. 200g prawn - peeled and de-veined.
3. 1/2 medium size onion - sliced or cubed.
4. 1 tbsp vegetable/corn oil.
5. 2~3 tbsp water
6. Pinch of salt (optional - may not need it as the saltiness of the dried shrimp might good enough for seasoning)
7. Sambal - pound or blend together the following ingredients :
a) 5~6 red finger chilies - unseeded
b) 1.5~2 tbsp dried shrimp - washed and rinsed.
c) 2 cloves of garlic
d) 1 tsp prefried belacan


Steps :
1. In high heat, grease the pan with vegetable oil.
2. Add in onion, stir for few second, add sambal # 6, stir and cook for about 1 minutes.
3. Add prawn, cook for 30 seconds.
4. Stir in asparagus strips, cook for 4~5 minutes. Sprinkle some water if it is too dry.
5. Salt to taste (optional)
6. Serve warm with white rice.

Tuesday, June 16, 2009

Stewed Pork Ribs in Bean Sauce (豆酱排骨)

Photobucket

OK, take a break for seafood, too much cholesterol.

I don't have much time to spend on cooking on week days, hence, I will cook a pot of dish that can be frozen for a few meals. That will save me a lot of time to prepare the dinner when I get back from work.

Photobucket

This is one of the dishes that is available in my freezer. It is very appetizing when you mix the gravy with the rice. For those busy working mom, may be you can try it?

Recipe :

1. 2lbs of Pork Rib (hot water bathed)
2. 5 cloves garlic - sliced
3. 2~3 tbsp of bean sauce 豆酱 (can be spicy or non spicy - your choice)
4. 4~6 dried chilies - unseeded
5. 1 tsp dark soy sauce
6. 2 pickled plum
7. a pinch of sugar (optional)
8. 250~300ml water (or as needed)
9. 2 tsp of corn starch mix with 3 tsp water

Steps :

1. Grease a heated pot with some oil.
2. Fragrance the garlic sliced then add in bean sauce. Stir for 30 seconds.
3. Add in dried chili, pork ribs and dark soy sauce.
4. Stir and cook for 2~3 minutes.
5. Add water, bring to boil.
6. Simmer for 15 minutes.
7. Add pickled plum, pinch of sugar. Simmer for another 20~30 minutes or until the ribs reach your desired tenderness.
8. Taste the gravy, add some water if needed.
9. Before removing from heat, add some corn starch water to thicken the gravy.
10. Serve with white rice.

Thursday, June 11, 2009

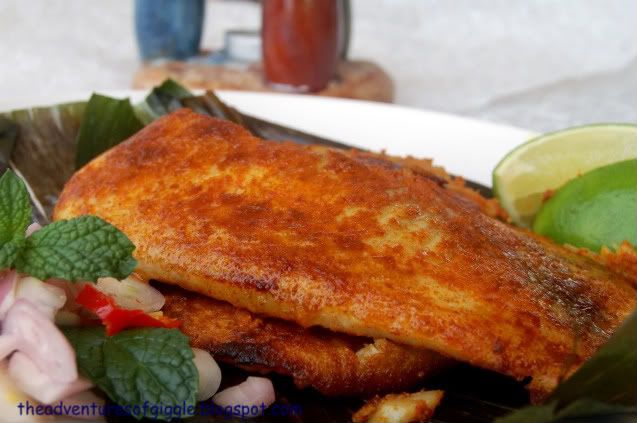
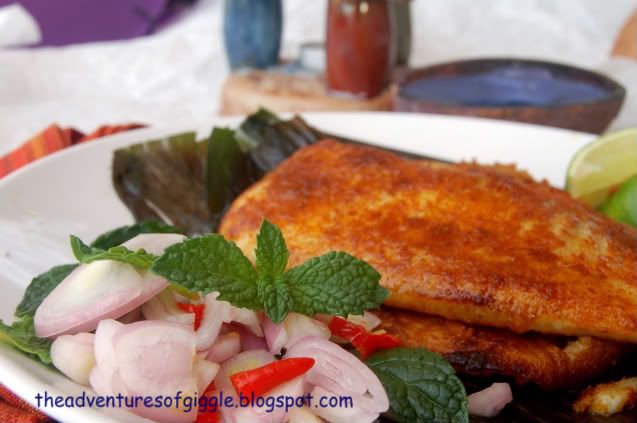
Banana Leaf Pan Fried Curry Tilapia with Mint Pepper Salsa

Banana Leaf Pan Fried Curry Tilapia
After I finished the the Sweet and Sour Chili Crab, here comes the fish.

If I were in Penang, I would make this with Kembong fish or stingray. It is impossible to get kembong here, and stingray is frozen, so it wouldn't taste nice if you compare it with the fresh fish available in Malaysia.

Photobucket

I got 2 tilapia fillets from Albertson's, since they were on sale. I should have bought more - two were not enough for both of us.

Photobucket

I pan fried the fish with banana leaf in between the pan and fish, it helps to keep the juice of the fish. I served it with the refreshing mint pepper salsa, it was like having a ikan bakar in Penang. :-p

Ingredients & Steps :

A ) Fish
1. 2 tilapia fillets - rub with 2tsp of curry powder and 1/8tsp salt. Marinate at least 3 hours or overnight for better flavor.
2. 2 sheets of banana leaves (about 8" x8")
3. 1 tbsp cooking oil

B) Mint Pepper salsa
1. 10 mint leaves or as needed
2. 5~6 pearl onions - sliced
3. 3 chili padi (chopped) or 1 habanero
4. 1/2 tsp fresh lime juice or as needed
5. Pinch of sugar and salt to taste

- Mix all ingredients B and refrigerate at least 1 hour before serve.

To cook the fish :

1. Heat up a large skillet, grease with a table spoon of oil.
2. Place a sheet of banana leaf on the skillet, then lay the fish fillets on top of it.
3. Cook for 3~3.5 minutes for each side with the cover on.
4. Turn and change the banana once.
5. Serve with mint pepper salsa B as above.

Tuesday, June 9, 2009

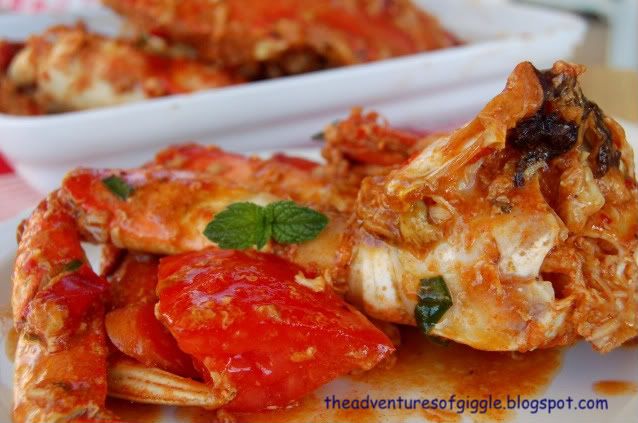
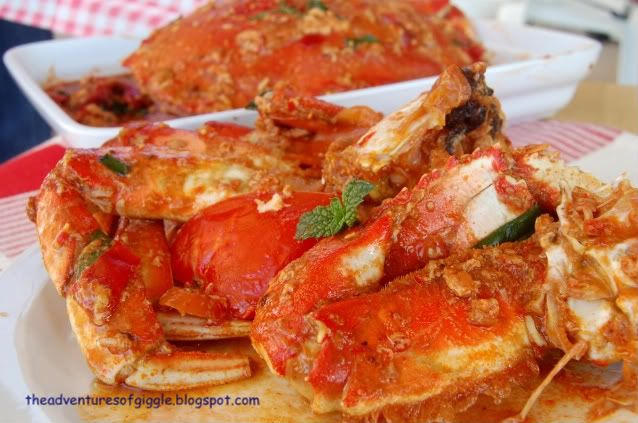
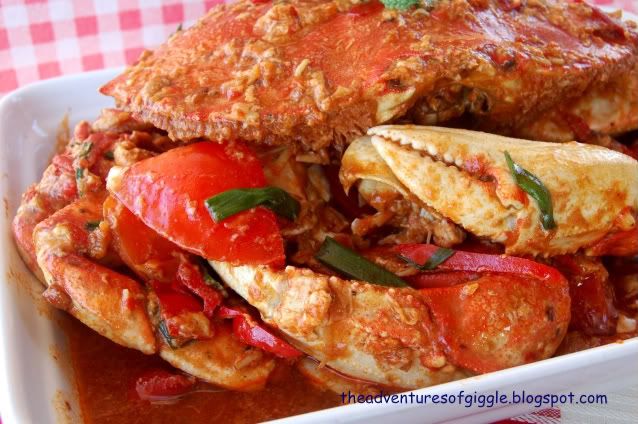
Sweet and Sour Chili Crab

Photobucket

Last week end was my seafood assignment. I made a couple of seafood meals. This would not happen always here in Arizona because the live and fresh seafood here is expensive. We couldn't afford to have seafood meal everyday.

Sweet and Sour Chili Crab

When I decided to start my seafood adventure, we went to Lee Lee to grab some necessary ingredients. We bought a huge Canada (Dungeness) live crab from the tank, it was about 3lbs, cost us USD$25... ouch!! >_< !!!! But...., sometime, we have to pamper ourselves for a good meal after being working so hard, right??? Sweet and Sour Chili Crab

When we got home, I felt so sorry had to fix the live crab. Of cause, you might query why didn't Tom help? Oh well, I think he would just pass out if I ask him to do so. He is a good man, would safe what ever animal he could from being hurt. (editors note: I was raised on a farm, silly! I've raised steers and lambs for slaughter. I'd have no problem dispatching this... sea monster! LOL! -Tom :-P )

OK, here's the recipe for what I normally cook for my family when I was in Penang.

1. 1 Canada Crab (3lbs).
2. 3 Red chilies (unseeded), pound with 2 cloves of garlic.
3. 6~8 thin sliced fresh ginger.
4. 3 cloves of garlic - chopped.
5. 1 medium size tomato - cut to 4~6 chunks.
6. Some carrot slices (optional).
7. 1 tsp oyster sauce.
8. 2~3 tbsp sweet chili sauce or as needed.
9. 2 tbsp tomato ketchup.
10. 100~150ml water.
11. Pinch of Sugar or to taste.
11. Salt to taste.
12. 1 tbsp corn starch mix with 1 tbsp water.
13. 2 egg whites.
14. Some red chili slices and green onion for garnishing.

Steps :

1. In high heat, heat and grease a frying pan.
2. Fragrant the garlic and ginger slices. Stir in the pounded chili and garlic.
3. Add in tomato chunks and carrot slices, stir for few seconds.
4. Add in crab, and ingredient # 7~9.
5. Stir and cook for about 1 minute.
6. Add some water and cover with lid. Cook over medium high heat for 2~3 minutes.
7. Uncover, switch to high heat. Add some more water if more gravy is desired, cook for another 2~3 minutes.
8. Add Sugar and salt to taste.
9. Add some corn starch water to thicken the gravy.
10. Add in egg white, wait for 3 seconds, stir and remove from heat.
11. Serve warm, gravy is perfect to mix with the white rice.

ENJOY!

Saturday, June 6, 2009

Blueberry, Cherry Cheese Cake Petites

Photobucket

I have posted this recipe before, but the photo was not so presentable because I didn't know that I would start my own blog at the time the photo was taken.

Photobucket

I made these cheese cakes for a friends gathering dinner again yesterday, so I took some nicer pictures before they all got eaten.

Photobucket

I like to make this for parties because it is very simple, fast and presentable. Here's the recipe again.

Photobucket

A) Crust base
1. 40~45pcs of bite size (about 1 inch diameter) NILLA wafers (mini vanilla wafers) or any kind of mini digestive cookies (as long as it can fit into your baking cup/tray.)

B) Cream Mixture
1. 2 packs of 8oz Cream Cheese (room temperature)
2. 2/3 cup sugar (reduced)
3. 2 eggs
4. 1 tsp lime or lemon juice
5. 1 tsp vanilla extract
6. 1 tsp orange zest (outer orange peel, grated VERY fine - optional, I like it because with a little bit orange flavor in it, you won't feel too creamy to eat)

C) Topping
1. Blue Berry, Cherry Pie Filling.


Steps :

1. Preheat the oven at 325F.
2. Mix the cream cheese, sugar and egg with an electric mixer until well blended.
3. Add lemon juice, vanilla extract and orange zest into the cream mixture, mix well.
4. Place the mini paper baking cup in the mini muffin tray (24pcs per tray), lay each of them with a piece of wafer.
5. Spoon the cream mixture into each baking cup (not too full)
6. Bake for 15 minutes.
7. Remove the tray from the oven, cool at room temperature for an hour or two, refrigerate at least 6 hours, better if overnight.
8. Top with your preferred fruit topping and serve cool.
Related Posts Widget for Blogs by LinkWithin