Wednesday, July 29, 2009

Mixed Mushrooms with Tofu in Claypot (三菇豆腐煲)

Photobucket

I need to get rid of my "spare tire" hanging there on my belly --> a side effect of baking and eating too much recently.

I decided to cook more vegetable and less meat (Tom can't live without meat (Editor's Note: Vegetarians are weird. Vegans doubly so.)), so I grabbed different kinds of vegetable and mushroom from the stores. Do you guys know that by consuming more fresh mushroom, your skin will be smoother? I am not sure if this works for you. I did have this experience while I was working in China few years ago. The cook in our hostel cooked at least 5~8 mushroom meals in a week.

Photobucket
Cute little beech mushroom!!

At that time, I was not a big fan of mushroom, but I did not have too much choices to eat. After several weeks of working there, I noticed that my skin of my arms and hands turned smoother (usually rough like sand paper.. lol), I started to cook and consume more fresh mushrooms afterward... hehehe... women --- beauty first!

You can cook this dish with any kind of fresh mushroom available. Amount of uses is adjustable to your personal liking. You don't have to serve it in a clay pot if you don't have one.


Ingredients :

1. 10 white mushroom - sliced
2. 1 stalk abalone mushroom - sliced
3. 1 small bunch of beech mushroom - separated
4. few pieces of fresh black fungus (can use pre-soaked dried black fungus too)
5. Some snow pea
6. 150g silken/soft tofu - cut to10cm thick slices
7. 3~5 cloves garlic - crushed or chopped
8. 1 tsp oyster sauce
9. Salt to taste
10. 2~3 tbsp water
11. Some Chinese celery for garnishing


1. Heat a lightly greased frying pan.
2. Brown the garlic, stir in ingredients # 1~4. cook for 2~3 minutes over high heat.
3. Add in snow pea, oyster sauce, continue to another 1~2 minutes.
4. Salt to taste, add some water if needed.
5. Transfer the mushroom to a clay pot, add in tofu, bring to boil.
6. Remove from heat, garnish with some Chinese celery when serve.


Monday, July 27, 2009

"Smiling" Char Siu Bao (开口笑 - 叉烧包)

Photobucket

Just wanted to share some pictures and findings for my char siu bao making recently, I have posted the skin recipe before, these are my findings and techniques for making the good "smile" of your buns --> cracking on the top. For full recipe, please read here.

Photobucket

1. While adding the baking powder liquid to the dough, make sure you knead it thoroughly to avoid uneven mixture, otherwise, there will be some little brown spots on the skin. To be safe, knead at least 10 minutes.

2. Rolling - leave the edge thicker than center for easier pleating.

3. While pleating, avoid any oil or gravy of the filing on the edge, try to pull more dough from the edge to the top, the thicker the dough on top, the bigger the smile. :-)

Photobucket
This time, I used the leftover char siu from the restaurant, more fat, but tasted better. I omitted the soy sauce and dark soy sauce, just used oyster sauce and hoisin sauce as gravy seasoning, I have added some green peas too.

Saturday, July 25, 2009

Tuna Salad with Cracker

Photobucket

I feel blessed to live in this peaceful and resourceful place. I have a very "bad" habit, people (especially my girl friends) hate to be around me, as I couldn't stop thinking about food. My schoolmates, colleagues, best friends blamed me for their weight gaining because I fed them too frequent, ..:-p, sorry ya..., I just wanted to share nice food with you all, I have not been selfish, right?

Photobucket

I am making this tuna salad for my afternoon snacks, it is too long for me to not have food during the gap between lunch and dinner, by taking this light afternoon snack, it actually helps you not to eat too much for dinner. See, I am caring about your figures too, friends! :-)

This recipe can be used for sandwich too. I hope you like it.

A) Any kind of crackers or sandwich bread you prefer.

B) Tuna Salad
i) 1 can light tuna in water (12oz) - drained
ii) 1/3 cup coarsely chopped onion
iii) 1/3 cup coarsely chopped celery
iv) some finely chopped chili padi/halapeno (if you like it spicy)
v) 3 tbsp of light whipped salad dressing or light mayonnaise
vi) some black pepper to taste (optional)
vii) Some lime juice (optional)

C) Topping
i) Some cherry tomato or persian cucumber slices
ii) Some mint leaves (optional)

Steps :

1. Mix well ingredients B
2. Serve with preferred crackers/bread and toppings.

Thursday, July 23, 2009

Pan Seared Zesty Lime Cod Fish

Photobucket
Wanna to make some nice dishes of your own for a candle light dinner with your loved one??

During this economic down turn, we have to watch out every single penny we spend, but, how do we maintain the quality of life? To avoid dining in a nice restaurant so frequent, Tom and I sometime will work together to set up a nice candle light dinner at home. Of course, I will be in-charge the cooking portion, what is Tom's responsibility?? He plays a very important role for the dinner --> Light up the candles! LOL..... (editor's note: Also the CLEAN UP!!! -TS)

So, what is tonight's special? -- Pan Seared Zesty Lime Cod fish. Don't panic, it is easy to prepare. You may use salmon fillets for this recipe too.

Photobucket
I added some Italian Balsamic salad dressing too, the fish actually tasted good without any sauce.

Ingredients and Steps :

1. 2pcs Cod Fish/Salmon (approx. 1lb)
2. 1 tsp olive oil
3. 1/2 tsp grated lime zest
4. Salt and garlic powder, black pepper
5. Zesty blend of basil, oregano, parsley, paprika
6. Some lime juice

Steps :
1. Marinate fish fillet with ingredient # 2~5 for at least 3 hours or longer for better taste.
2. Heat up a lightly greased frying pan.
3. Slowly place the fish fillet on the pan
4. Switch to medium high heat, pan fry for 3~4 minutes each side.
5. Remove from heat, sprinkle with some lime juice when served.

Monday, July 20, 2009

Hot Dog Onion Bun, Blueberry Bun

Photobucket
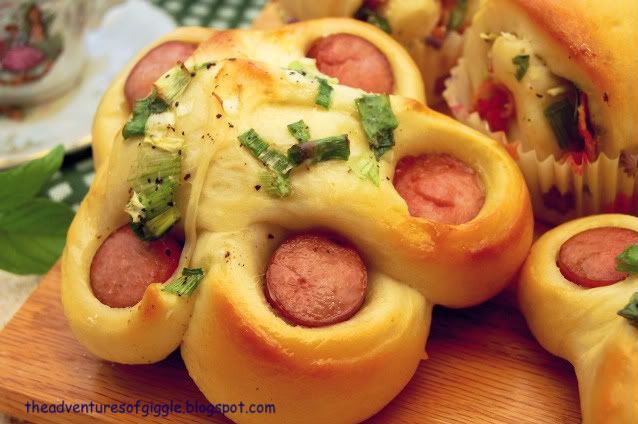
I'm sooooooooooooooooooo happy!!! My first attempt to shape hot dog bun and it turned out so well, just like the one sold at the bakery shop!!

I just got a bread maker recently, it makes my life so much easier. I don't have to knead the hell out of the dough. You just have to get all the ingredients ready and let the machine do all the work.
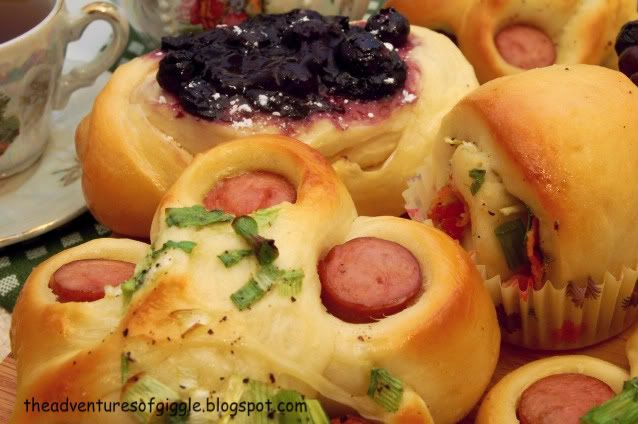
Photobucket
Assorted Buns....

I have not tried the full function, just use the dough function to do the mixing and kneading process, then I remove the dough to a large mixing bowl. I will definitely make more bread with the full function of this machine in the near future, stay tuned ya!!!
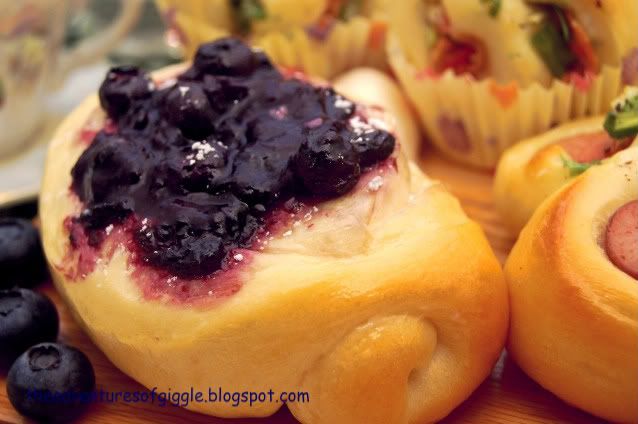
Photobucket
Blueberry Bun.

For the dough base, it is a bit different from my bacon onion roll recipe as I was running out of all purpose flour, I substituted it with lesser amount of cake flour and increased amount the bread flour and milk powder. I increased the amount of sugar too as the last attempt was a bit too bland. Eventually, all turned out well, I will use this recipe as my bun making in future.

Photobucket
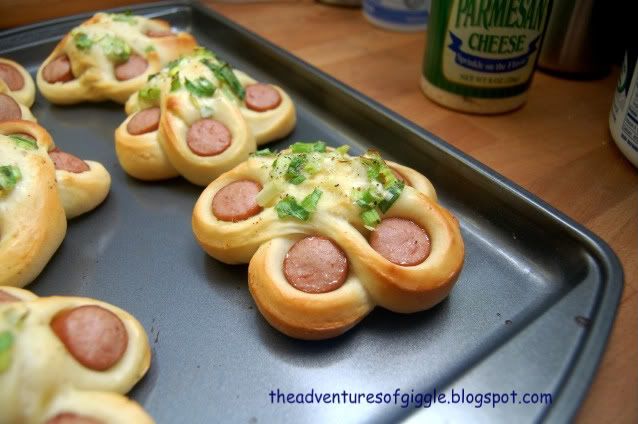
Fresh from the oven!

Photobucket
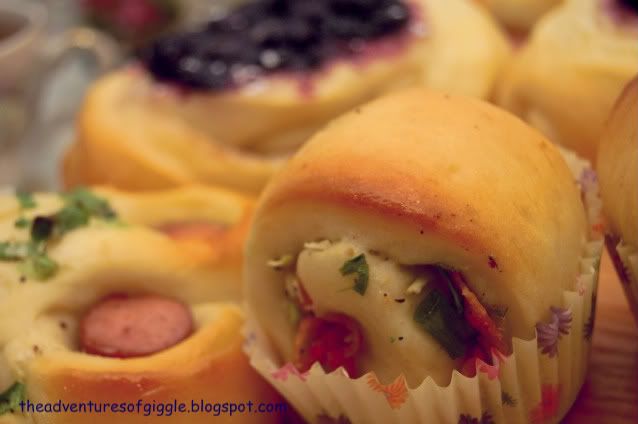
Bacon Onion Roll again!!! Our favorite, can't miss it! :-)


Photobucket
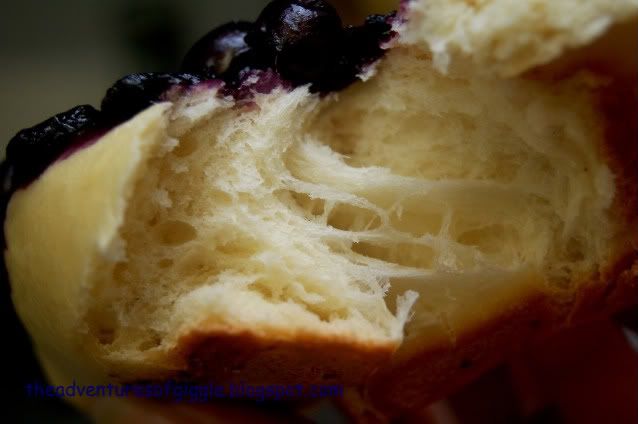
Inside texture, soft and moist...

Here are my recipes and steps, happy baking! :-)

A) Dough
1. 1 pkg instant yeast (7g)
2. 480g bread flour
3. 120 cake flour
4. 110g sugar
5. 10g salt
6. 25g milk powder
7. 300ml water
8. 1 egg
9. 60 unsalted butter - soften in room temperature

B) mix some egg yolk and milk to brush the surface before place in the oven

C) some butter to brush on the surface after remove the buns from the oven

Steps :
(If you don't have bread maker, please refer to my previous post - Bacon Onion Roll for the hand mixing and kneading steps).

1. Place all the liquid ingredients (water and egg) first to the bread pan of the machine.
2. Then add all the dry ingredients EXCEPT yeast.
3. Make a small well on the top of the dry ingredients (not too deep to keep yeast away from the wet ingredients, add the yeast to the well.
4. Select the DOUGH function and press start.
5. My bread maker takes - 6 minutes for first knead (mixing) and 24 minutes for kneading.
6. I added the butter after first knead.
7. When the kneading is completed, remove the dough into a large lightly greased mixing bowl (this is optional, I wondered my bread pan is not big enough for my rising).
8. Cover the mixing bow with plastic film, rise for 2 hours 30 minutes at warm (approx. 28C) and moist place (Arizona is too dry, I rose my dough in the oven-non heated, and put a bowl of boiled water in it).
9. The dough should be triple in size after 2.5 hours.
10. Punch the dough with your fist to deflate the gas.
12. Divide the dough to 60g balls (I didn't divide all, I kept some for my bacon roll making), round them with your hands.

D) For Hot Dog Onion Bun
i) 6 hot dog
ii) 1/2 cup of spring onion mix with 1/2 egg, pinch of salt and sugar, black pepper.

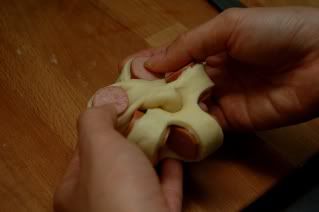
1.Flatten the dough A, roll up with a piece of hot dog.
2. Cut it (just cut through the dog)
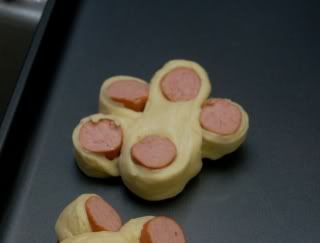
3. Twist and shape it as picture shown, let it rise for another 50 minutes, cover with plastic film.
4. 15 minutes before rising time up, pre-heat the oven at 350F.
5. Brush the egg liquid #B
6. Top each bun with a spoon of onion mixtures.
7. Bake for 13 minutes
8. Remove the buns from the oven, lightly brush with butter for shinny effect.

Temperature and time are to be adjusted as different oven will bring different condition and result.

E) Blueberry Bun
i). 1/2 cup (or as needed) of homemade blueberry jam - recipe here.
If blueberry jam is not available, use blueberry pie filling and omit ingredient #ii below.

ii). Some fresh/frozen blueberries.
iii). Some icing sugar (optional)

1. Flatted the dough ball, roll it up.
2. Let it rise for 50 minutes.
3. Cut the middle of the dough with scissors
4. Brush with egg liquid B
5. Top with blueberry and jam.
6. Bake for 13 minutes.
7. Lightly brush with butter after remove from oven.
8. Sprinkle with some icing sugar on top of the buns. (optional)

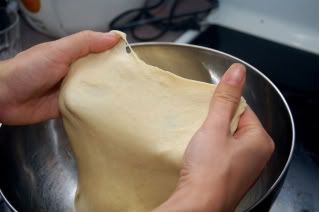
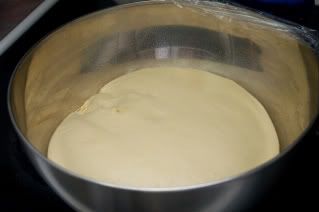
Stretch to check the texture after kneading --> size of dough before rise
PhotobucketPhotobucket

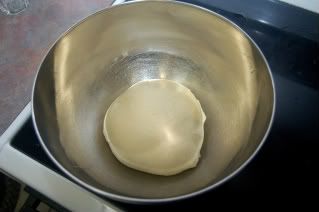
Size of dough after rose ---> punch to deflate the gas
PhotobucketPhotobucket

Hot dog bun making
twist and shapePhotobucket


Sunday, July 19, 2009

Kreativ Blogger Award


My sincere thanks to Small Small Baker and Amy from Cooking Crave for awarding me Kreativ Blogger Award, this is a big encouragement for me to keep inventing and posting more recipes here.

The Kreativ Blogger Award comes with some rules:

1. You must thank the person who has given you the award.
2. Copy the logo and place it on your blog.
3. Link to the person who has nominated you for the award.
4. Name 7 things about yourself that people might find interesting.
5. Nominate 7 other Kreativ Bloggers.
6. Post links to the 7 blogs you nominate.
7. Leave a comment on which of the blogs to let them know they have been nominated

For those who have been known me for a long time, it is very easy to categorize me in "Hunger for Food", for those who just met me, here, I would like to talk something about myself:

1. My BIGGEST and LONG LASTING passion is everything about food.
2. Thanks to God that my figure is still under control, this is really a hard job for a food hunger like me. My close friends in Malaysia are always afraid to dine with me as I will order too much foods and eat non stop. Even while I was working in the office, I would have about 5 meals in a day. lol!!!
3. If I crave for something I really like, I don't care how much time it takes me to drive or to prepare in order to satisfy my stomach.
4. Cooking is one of my stress relief treatment, while I am cooking, I will forget everything because I enjoy and concentrate on the process of cooking.
5. I wish to keep a "home feel" for my honey and family, because for me, there is nothing worth more than to have a homemade meal together with my family.
6. One of the reason to keep up cooking is the foods sold out there are expensive with just little ingredients, that makes me always have to spend extra money if I order to add extra ingredients, in this case, why don't I cook it myself?? I can add as much as I can. LOL!!
7. The reason I start this blog because I am so far away from my family now, I want to share what I am eating and cooking here, and also to my friends, I don't have to repeat the recipes I have given, just tell them to read my blog and share our cooking adventures.

I would like to give this Kreativ Blogger Award to the following bloggers :

1. Agnes Sim - http://dreamlandstation.blogspot.com/ - I am so clumsy on handicraft, I admire her job on making so many lovely jeweleries.
2. CK Lam - http://www.what2seeonline.com/ - Her blog is so professional with detail s of information and beautiful photos about her food huntings, sometime, her post makes me so craving about Penang food and just grab the ingredients from the stores and cook it by my own. :-p
3. Gourmet Garden - http://gourmet-garden.blogspot.com/ - I got to know her because we post the same topic in a same month. We probably have a same dream - want to own a restaurant some day. :-)
4. Do what I Like - Florence - http://wlteef.blogspot.com - I got attracted by her chilled mango cheesecake, still no time to try out the recipe.
5. Mitong - http://www.wretch.cc/blog/mitong - you will find a lot of healthy recipe and pretty photos out there, but it is in Chinese. :-)
6. Penang Tua Pui - www.penangtuapui.com - my food buddy that we never met each other. lol, just love their food hunting adventures.
7. boo_licious - http://masak-masak.blogspot.com - you will find some interesting food hunting and recipes here.


Blueberry Jam

Photobucket

Blueberries again!!! You can't blame me, its blueberry season!!!! You just have to pay 20% of the price that they are used to be, so I grabbed so much of it and freeze them. You may see few more blueberry recipes posted on my blog in the next couple of weeks :-p.

Photobucket

I promised my friend that I would post my blueberry jam recipe last time when I posted my blueberry scones recipe. I think this is the easiest jam to make, you don't have to add too much sugar in it as blueberry is not that sour like raspberry and blackberry.

Here's my simple blueberry jam making :

1. 1 kg blueberry
2. 1 tbsp brown sugar
3. 1 tbsp maltose (麦牙糖) - can be omitted if it is not available, but have to cook about 20mins longer to thicken the jam.
5. 1~2 tbsp honey or as needed to your preferred sweetness.

Steps :

1. In a non stick sauce pan, simmer the blueberries for 30~40 minutes, smash the raspberries with a wooden spatula or potato masher while cooking.
2. Add in ingredient # 2 and #3, stir until dissolved.
3. Simmer for another 20 minutes, stir occasionally.
4. Remove from heat, leave to cool for 2~3 minutes.
5. Stir in honey, mix well.
6. When the sauce is completely cool, storage in a clean jar, cover tight and refrigerate.

Thursday, July 16, 2009

Clay Pot Chicken Rice (煲仔鸡饭)

Photobucket

I have some chicken leftover from making sizzling noodles. It can be used for clay pot chicken rice too. The ingredients and steps of the chicken and gravy are the same. You may refer to my sizzling noodle post. I will just post the steps of cooking the rice with other ingredients here.

Photobucket


A) Chicken & Gravy
1) 2 pieces of chicken chunks and some gravy (please refer to sizzling chicken noodle post)

B) Rice
1. 1/2 cup of rice for a small clay pot - washed and pre-soaked in water for an hour
2. 1/2 cup of water, save some extra hot water.

C) Other ingredients
1. Few slices of Chinese sausage (腊肠)
2. 1~2 chunks salty fish
3. 1 egg
4. Some sesame oil
5. Some green onion or Chinese celery for garnishing

Steps :

1. Boil the rice and water in a clay pot, simmer with cover on for 2~3 minutes over medium low heat.
2. Add in salty fish chunks, cook for another 1 minutes.
3. Scoop in chicken and gravy, continue to cook for 2~3.
4. Add in sausage slices and egg, cook for 2 minutes.
** Be careful to adjust the heat, sprinkle some extra hot water if needed**
5. Drop some sesame oil, garnish with some green onion or celery when serve.

Tuesday, July 14, 2009

Sizzling Chicken Noodle (铁板面)

Photobucket

My friend in Penang complained that I should have posted more Asian recipes. Eerrr?? I think I have been posting more Asian recipes..dear :-P

Tom bought me a cast iron sizzling pan few months ago. I like to serve my food in a clay pot or a sizzling pan because they keep your food warm longer. I especially like pipping hot. :-p

I like to order sizzling noodle if I dine in at the food court inside the shopping mall. I can say it is available in every shopping mall? It is because I seldom find a good noodle stall operate in the food court. If the sizzling noodle served to me is not good, I could just simply add in soy sauce and chili to "cure" them and it won't tasted too bad since the noodle served warm with the sizzling plate.

Photobucket

It is not difficult to make sizzling noodles on your own, here's my recipe and direction. Hope you like it. :-)


A) Noodle for 3~4 people.
1. I use ramen noodle - cook to about 80% doneness, as it will be cooked again on the sizzling pan. You can substitute ramen with Yi Mee.
2. 3~4 eggs
3. Some green onion or cilantro for garnishing.

B) Chicken
1. 600g boneless chicken leg meat - marinate overnight with :
i) 1tbsp soy sauce
ii) 1 tbsp oyster sauce
iii) 1/2 tsp dark soy sauce
iv) 1 tsp sesame oil
v) 1/4 tsp white pepper
vi) 2 cloves garlic - crushed
vii) few ginger slices

C) Gravy
1. 2~3 cloves of garlic - minced
2. Few ginger slices
3. 1 tsp soy paste (normal or spicy)
4. 3~4 dried chili - unseeded, pre-soaked
5. 2~3 dried mushroom - pre-soaked, sliced then rub with some sugar (a trick to make the mushroom more springy)
6. 250~280ml water.
7. 1 tsp oyster sauce
8. 1/2 tsp dark soy sauce
9. A pinch of sugar or to taste
10. Salt to taste
11. 1 tbsp spoon corn starch mix with 2 tbsp water to thicken the gravy.

Steps :

1. Heat and grease a frying pan.
2. Fragrant garlic and ginger slices.
3. Add in soy paste, dried chili, mushroom slices, stir for about 20~30 seconds, watch out the heat, don't burn the ingredients.
4. Stir in marinated chicken, cook for about 4~5 minutes.
5. Slowly pour in water, bring to boil.
6. Add ingredients C7~C10, thicken the gravy with corn starch liquid.
10. Remove from heat and set aside.
11. Heat up the slightly greased sizzling pan (about 2~3 minutes).
12. Add in noodle, immediately, scoop the chicken and gravy to the sizzling plate, cook for about 1 minutes.
13. Slightly stir the noodle to coat well with the gravy.
14. Add in egg, for another 30~45 seconds or the egg reach your desired doneness.

Saturday, July 11, 2009

Summer Apple Salad

Photobucket

Hot!Hot!Hot!!!! The heat here drives me crazy!Couldn't just pack and run away from here.. lol!! It makes me just want to eat or drink something cold. Ice water, ice coffee, smoothies...! What about some chilled apple salad?? :-)

Photobucket

Another summer dish, chilled and refreshing. If you worry about it being fattening, use light mayonnaise (low fat), it tastes as good as normal mayo. And if you want to make your life easier, use canned or frozen corn instead of fresh corn and shuck with knife, I almost cut myself. :-p

Photobucket


If dried cranberries are not available, substitute it with raisins, or any dried berries or fruits you can get.

Simple and refreshing!

1. 1 Fuji red apple - cubed and soak in salt water for at least 10 minutes, drain well.
2. 1 Green apple - cubed and soak in salt water for at least 10 minutes, drain well.
3. 2/3 cup of cooled cooked sweet corn (or canned corn).
4. 1/2 finely chopped cabbage.
5. 1.5~2 tbsp light or normal mayonnaise
6. Some dried cranberries or raisins for topping.

Steps :
1. In a large mixing bowl, mix together ingredient #1~#5.
2. Chill for at least 6 hours before serve.
3. Serve cold, top with some dried cranberries.

Friday, July 10, 2009

Mini Pizzas

Photobucket

It has been a while since I last made my pizza. I don't like to just eat one kind of topping. This time, I split the dough into 4 portions, so I could make 4 different toppings - pepperoni, grilled chicken with onion, mushroom pepper and cheese.

Photobucket
Grilled Chicken Topping

I used the same recipe as last time but halved the volume. It yield 4 pieces of 4" size pizza. If you want to make more, just double the volume.

Photobucket
Pepperoni Topping


Pizza crust recipe :

1. 1/2 pack (3.5g)instant yeast
2. 1.5 cups all purpose flour (normal flour)- extra for dusting
3. 1/2 tbsp of sugar
4. 1/2 tsp salt
5. 1.5 tbsp olive oil/vegetable oil
6. 1/2 cup warm (110F/43C) fresh milk
7. 2 tbsp warm (110F/43C) water

Steps :

1. Sieve all the dry ingredients except salt in a large mixing bowl. Add in the salt in flour mixture after sieved.
2. Mix the milk, water and oil together, then pour into the flour mixture, stir until all the dry ingredients mixed well.
3. Dust your hands and working surface with some flour and slightly knead the dough for 3~5 minutes or until it forms a soft ball.
4. Put the dough in a slightly greased bowl, cover and let it rest for 30 minutes.
5. Remove the rested dough and place it on the working surface and knead about 4~6 times.
7. Split the dough into 4 balls, and roll to about 4" round piece.
8. Let the dough rest 5 minutes before you top with your favorite sauce and topping.
9. Bake in an oven preheated to 425F/218C for 12~15 minutes.

Tuesday, July 7, 2009

Steamed Tofu (bean curd) with Ground Pork

Steamed Tofu

Tofu (bean curd) is commonly used as a substitute for meat in Asian vegetarian meals, it contains large amounts of iron and protein. It is also very popular for people on diets. I am a tofu lover, I used to consume tofu (soft or hard) everyday - steamed, stir-fried, deep-fried, tofu soup, tofu dessert..., whatever dishes that made by tofu, I would surely love it, and never feel sick of it.

Tofu has very little flavor. In order to keep Tom eat healthy, most of the time, I cook tofu soup with sea weed. He always said that tofu tasted bland. To make him consume more tofu, I came up another recipe - steam tofu with some ground pork, mushroom and carrot topping. He is more happy to eat tofu now. :-)

Photobucket

The ingredients are adjustable to personal desire.

A)
1. 1 pc of soft tofu (approx. 1.5" thick, 2.5"W X 6"L)

B)Topping
1. 1.5 tbsp ground pork (if you want to make a meatless meal, you may substitute it with bamboo shoot or vegetarian meat)
2. 1 dried mushroom - pre-soaked - finely chopped
3. 1 clove garlic - minced.
4. Few slices of carrot

- again finely chop the ingredients # 2~5 until well combined, season with 1/2 tsp soy sauce, 1/4tsp oyster sauce, a few dashes of white pepper, a few drops of sesame oil and garlic oil.

C) Sauce
1. 1 tsp soy sauce
2. 1/2 tsp oyster sauce
3. A pinch of sugar
4. 1 tsp hot water
5. Some cilantro for garnishing (Unless you hate cilantro! -Tom)

- mix the sauce ingredients in a sauce bowl.

Cooking :
1. Boil the water.
2. Spread the topping evenly on top of the tofu.
3. Steam for 12~15 minutes.
4. Before remove from heat, add in the sauce C as needed. drop a little sesame oil and garlic oil. Garnish with cilantro
5. Serve warm

Sunday, July 5, 2009

Grilled Italian Squash and Zucchini

Photobucket

We have had too many heavy meals recently. I have to consume more vegetables to balance my diet, because my figure (weight) is growing!! LOL...umm, it is very hard to get the balance between good food and your body figures!

I previously didn't like Italian squash or zucchini, as I was not impressed by its taste and texture after being stir fried. I was wrong, ti shouldn't been stir fried - it tastes awesome for grilling. I learned this from our friend's gathering. Jim Wilson showed me how easy for the preparation and seasoning. I will definitely make
this again and again for our meatless meal.

Photobucket

Recipe & Steps :


1. 2 each Italian Squash and Zucchini - cut to about 3" strips.
2. Some Sweet Onion Slices.
3. Some red or orange pepper slices - optional, I used whole sweet peppers.
4. 1 tsp of olive oil.
5. Some parsley flakes.
6. Salt and garlic to taste.
7. Some black pepper.

Steps :

1. Preheat the grill, place a sheet of perforated heavy duty aluminum foil on the grate.
2. Rub the squash, zucchini, onion and peppers with olive oil.
3. Sprinkle some parsley, salt and garlic, toss to season evenly.
4. Grill for about 4~5 minutes with cover on, turn once or twice.
5. Sprinkle some black pepper, salt and garlic again (if needed) to taste before remove from heat.
Related Posts Widget for Blogs by LinkWithin