Sunday, August 30, 2009

My Messy Vegetable Garden

First of all, I must confess that I don't take proper care of my vegetable garden, but... but.., we can still grow something that doesn't need too much care of it. The heat here in summer is really killing us (110F/42C), not much work we can do for our garden (well, try to find an excuse :-p), secondly, we are busy from work, cooking and blogging... (more excuses..lol)

Anyway, we still got something to grow in our garden, you can tell how messy it is from the following photos that I am going to show you, a lot of weeds. We grow potato leaves, chilies, mint, oregano, pumpkin, winter melon, water melon, lemon grass and green onion. Most things we can grow in summer which grow wild and don't really need weeding anyway. I think we can harvest the pumpkin and winter melon early of October. I will take the photos again then.
In the fall we can start to grow some more orderly vegetables!

Here comes our vegetable garden tour! :-)

3 months ago.....

Photobucket
Oregano...

Baby lemon grass
baby lemon grass

Photobucket
little mint....

Photobucket
Still empty....

3 months after......umm...messy started.... :-p

Photobucket
Pile of pumpkins...accidentally planted by Tom. (I didn't know they would grow THIS well! -Tom)

Photobucket
Big bunch of lemon grass, I save a lot of money to buy it from Asian supermarket!

Photobucket
The mints grew really big and killed my oregano.. :-(

Photobucket
Potato leaves.. I think this is the easiest vegetable to grow.. also got a big pile of them and have to give away to my friends.

Photobucket
Baby winter melon. I bought winter melon from the store and there were some seeds in it. Just tried to plant it and didn't expect they can grow... :-)

Photobucket
Pumpkin... harvest soon :-)

Photobucket
More baby pumpkins out there!!!

Photobucket
Of course, this one can't be missed!! Chili!!

Photobucket
I have more than 10 chili trees growing, I don't know which is which, might be chili padi from Malaysia, habanero (the most spicy chili in the states, no kidding), bell pepper or sweet chili!!


Photobucket
Onion!! Just have to cut it whenever I need it!

Wednesday, August 26, 2009

Sambal Petai and Prawn Again!!!

Photobucket
I have posted this recipe before. I just wanted to update it with better photos as I was in a hurry while shooting the last photos.

While I was reading Petite Nyonya's post, it reminded me that I still have a pack of petai in my freezer. The frozen petai is from Thailand and doesn't taste as good as the wild and fresh petai in Malaysia. However, it is good enough to relieve my craving for it. I can't complain too much! :-p

Normally, I will cook some egg plant whenever I consume petai, it is a trick to get rid of the awkward smell of the urine after consuming petai. Trust me, it works!! :-)

Photobucket


Tom loves petai so much, surprise huh?? :-p

Recipe from my previous post :
1. 120g petai
2. 400g medium prawn (trim the spikes and de-vein)
3. 170g shallot
4. 125g red chili (unseeded)
5. 5g dried chili (unseeded)
6. 1/2 tbsp dried pre-fried belacan
7. 10g fresh turmaric
8. 1 tbsp dried shrimp
9. 2.5 tbsp vegetable oil
10. 160~80ml water
11. 10g tamarind fruit - mix with 1.5 tbsp water for juice
12. Salt to taste
13. A pinch of sugar to taste (optional)

Steps :

1. Blend well the ingredient #3~#8.
2. Heat up the frying pan and oil.
3. Pour in sambal mixture, stir in medium high heat for 7~8 minutes.
4. Add in the prawns, continue to cook (gradually add in water) until the prawns are almost done (about 3~4 minutes, depends on the prawn size),
5. Add in petai and tamarind juice cook for another 2~3 minutes.
6. Season to taste.

Monday, August 24, 2009

Homemade Fish & Chips

Photobucket
After a very Chinese meal, here come with a western meal. :-)

I think Fish & Chips and Chicken Chop are the top 2 items listed on the menu in western restaurant/stall in Malaysia. About 10 or 15 years ago, when we talked about western food, many people would think that their choices would be only Chicken Chop or Fish & Chips. I am not a big fan of meat, I usually order fish & chips.

Sometimes, it is actually faster and easier to make western food compared to oriental food. But I don't know why they are selling it so expensive in the stall/restaurant.

Photobucket
Crispy and delicious!!

It took me less than 15 minutes to have this fish & chips done. You may make the salad/coleslaw ahead and refrigerate them until needed.

I use the same breadcrumbs (Old London brand) that I used to make my chicken cordon bleu and onion rings. I think it is also available in the supermarket in Malaysia, may be different brand. Just look for it in the western seasoning aisle.

Here's the recipe. You may make your own western candle light dinner at home. :-)

1. 2pcs (440g) cat fish fillet ( can any fish fillet you prefer) - rub some salt on both sides.
2. 2/3~1 cup all purpose flour
3. 1/2 tsp salt
4. 1/2 ~ 2/3 cup of milk
5. 2/3 cup of seasoned bread crumbs (or as needed)
6. Oil for deep frying

Side dishes :
1. French fries
2. Salad/coleslaw
3. Some tartar sauce and lemon/lime juice to serve with fish


Steps :
1. Heat up the oil in a deep frying pan.
2. Mix well the flour and salt.
3. Place the fish fillets on the flour mixture, dust/coat both sides well.
4. After all the coating is done, add milk into the flour and stir to form a smooth batter.
5. Dip the floured fish fillets the batter, then remove and place it on the cooling rack by a kabob skewer (or any thin stick), let the batter drip off a bit.
6. Get ready the seasoned bread crumbs in a plate. Move the fish from the rack with a skewer, coat it with the bread crumbs evenly.
7. Deep fry in the heated oil over medium heat for 3~4 minutes or until it turns golden brown.
8. Sprinkle some lemon/lime juice and serve with tartar sauce.

Floured fish fillets
Photobucket

Bread crumbs coated
Photobucket

"Old London" brand seasoned bread crumbs
Photobucket

Friday, August 21, 2009

Pak Cheng Soup - 八珍养颜汤, 八珍面线

Photobucket

My friend in China is bugging me to post this recipe for her in Mandarin, as she doesn't speak English. I was thinking to take this as an excuse to skip my English lesson for one post. :-p. I thought that it might be easier for me to post this recipe in Mandarin too because it is related to Chinese medication. Anyway, I will still post bilingually.

I was suffering from the pain of PMS(Premenstrual syndrome) long time ago, my mom kept nagging me about consuming this traditional Chinese herbal medicine soup. It is to ease my pain and help to improve my blood circulation. The "Pak Cheng" prescription contains ligusticum wallici, Angelica Sinensis, Paeonia Lactielora, Glutinosa, Coponosis Tangshen....etc. You may cook this with some pork ribs or chicken. Or, you may substitute the meat with eggs too.

I bought few packs of "Yew Chian Haw" brand Pak Cheng soup ingredients from Penang. When I can't finish the whole pot of soup, I will do some creative cooking by adding the wheat flour vermicelli (mee sua), mushroom and vegetable in the soup, it becomes another yummy and healthy meal.

对许多女性来说, 经痛是个挥之不去的恶梦. 以前的我是其中之一. 比较普遍的解决方法就是吃止痛药, 可是我总是担心会有副作用.

终 于, 在妈妈一再唠叨下, 好几年前开始, 每次月事一完, 我就会自己炖一锅的八珍汤来调养身体, 这配方不但可以改善经痛的问题(当然啦, 生冷食物尽量避免), 而且对血液循环也有帮助, 让我们脸上气色比较红润. 我都是买现成包好的配方 (成份有川弓, 当归, 熟地, 防党参, 大枣等等), 特别喜欢"游建好"这品牌, 就算不加骨头,不加肉,汤喝起来也很甘醇, 不会苦. 在马来西亚的超级市场都可以买到.

Photobucket


我每次煮一锅, 都要分好几次才能喝完. 所以就动脑筋想到不如加点面线, 香菇, 蔬菜, 搞搞新花样, 效果还不错哦, 喜欢吃素的人可以试试看. 如果想吃荤的, 就加点排骨或鸡肉.

Photobucket

我个人觉得不加肉类真的蛮好喝的, 甘醇而不腻. 我都加鸡蛋 (妈妈说可以补充钙质哦) 想滋补又怕肥的朋友,不妨试试看吧.

材料:

1. 一包(120gm) "游建好" 八珍养颜汤配方
2. 2~3 个鸡蛋 (如想吃荤就以排骨或鸡肉代替)
3. 枸杞 - 随意(我自己另外加的)
4. 1000ml 水 (包装上是2000ml), 我比较喜欢浓一点的味道, 可依个人口味调整, 如果是要加面线的汤就要浓一点.

如果想加面线,另外准备以下材料:
1. 面线
2. 香菇 (先泡软)
3. 枸杞 - 少许
4. 当季蔬菜
5. 香菜(芫荽) 或芹菜少许
6. 麻油或蒜油少许
7. 绍兴酒-随意(不喜欢可以不加)
8. 盐少许


步骤 :
1. 把水烧开, 加入配方和鸡蛋, 中小火炖15分钟.
2. 把鸡蛋捞起来, 拨掉壳, 再加入汤里, 再炖多45分钟就可息火.
3. 如果只想喝汤, 不加盐也可以.


4. 如想加面线的话中途可以把一半的材料分到另外一个锅, 再加香菇和
枸杞一起煮.
5. 面线和蔬菜再另外烧水煮熟.
6. 汤煮好以后加点盐调味即可.
7. 把汤淋在面线, 撒点香菜, 滴几滴麻油或蒜油, 和绍兴酒, 又是一道美味可口的药膳面食啦!!!

Ingredients :

1. 1 pack (120gm) "Yew Chian Haw" Pak Cheng
2. 2~3 eggs (may use some pork ribs or chicken)
3. W
olfberry (lycium chinense) - optional
4. 1000ml water (instruction - 2000ml, I like stronger taste, so, you may adjust the volume to personal preference)

For adding noodle :

1. Noodle
2. Mushroom (pre-soaked)
3. Some w
olfberries
4. Some vegetable
5. Some cilantro or chinese celery
6. some sesame oil or garlic oil
7. Salt to taste
8. Shao Xing wine (optional)

Steps :

1. Boil the water, add in "Yew Chian Haw" Pak Cheng ingredients and eggs.
2. Return to boil, simmer over low medium heat for 15 minutes.
3. Remove the eggs from the soup and peel the shell, then return to the soup.
4. Continue to simmer for 45 minutes.
5. Serve warm. Season with some salt if desire.

To add wheat flour vermicelli (mee sua)

1. Split the soup to 2 pots.
2. Add in mushroom and wolfberry.
3. At the meantime, cook the mee sua and vegetable in a separate pot.
4. Season the soup with some salt.
5. When serve, top few drops of sesame oil or garlic to taste.
5. Garnish with cilantro or Chinese celery


"游建好" 八珍养颜汤. 之前从PENANG带过来的, 最后一包咯....., 要空运过来咯....
Photobucket


Wednesday, August 19, 2009

Curry Potato with Paruppu and Roti Canai (short cut version)

Photobucket

Isn't that nice to live in a food paradise? I didn't have to think about cooking prawn noodle, laksa, roti canai (Indian paratha) on my own in Penang - I could easily get it everywhere, and they simply tasted good!

Paruppu curry (Dhal) is usually served along with roti canai in Malaysia. I always asked the boss to give me more curry gravy, and I'd eat a spoonful of the curry with every bite of my roti canai. Yummeh!!!!

I found a frozen roti canai in Asian supermarket here, and guess what?? It is made in Malaysia - Penang, Gelutong (Yay!!!), it is "Memori" brand, I strongly recommend this brand to those living out of Malaysia. It tasted the best among from other brands. Crispy and not oily.

Photobucket
Crispy layers of "Memori" brand roti canai.

Now I got the roti canai, but it wouldn't taste right without paruppu. The instant dhal I got from the store is the thicken version, I like a bit runny one better. So, what did I do?? It is time consuming to tenderize the dhal (the yellow split peas). So I invented a short cut version! LOL!!!

Tahdaaaah..... I cook a pot of curry potato, then mix with a pack of dhal, the gravy tasted exactly the same like the one sold at mamak stall! yay me!! yay me!!! hahahah

Here's my recipe for the curry, I cook this to serve homeless people too while I was volunteering at Tzu Chi, it is meatless meal.

1. 1tbsp garam masala (optional) - I added it for spicier and stronger taste.
2. 4 tbsp curry powder
3. 1 tbsp turmeric powder
4. 2~3 tbsp corn/vegetable oil
5. 1 large onion - squared or sliced
6. 1 stalk lemon grass (editor's note: This stuff, along with pumpkins, yam leaf plants, and winter mellons, are taking over the back yard!)
7. 8~10 curry leaves or as needed
8. 2 medium size potato (approx. 350g) - chunked
9. 1 large carrot (approx. 120g) - chunked
10. 3~4 tomatoes (approx 200g) - chunked ** add some tomato puree/sauce if you like it sour**
11. 450~500ml water
12. 1 pack of instant Dhal (Dal)
13. 30 ml coconut milk
14. Some sugar to taste
15 Some salt to taste.

Steps.
1. Mix ingredient # 1~#3 with 1/2 cup of water.
2. Grease a heated non-stick pot with oil.
3. Fragrant the onion (about 2~3 minutes)
4. Add in curry mixture # 1, lemon grass and curry leaves, stir and fragrant for about 3~5 minutes.
5. Add tomato, carrot and potato chunks, stir fry for about 3 minutes, sprinkle water if necessary.
6. Pour in water just enough to cover 90% of the potato, carrot and tomato chunks.
7. Bring to boil, simmer at low medium heat for 20 minutes.
8. Add instant dhal, tomato puree/sauce (if you like it sour) stir to mix well, simmer for another 10 minutes.
9. Add coconut milk, sugar and salt to taste. Bring to boil and remove from heat.
10. Serve with rice, noodle or roti canai.

The instant dhal (dal)
Photobucket

"Memori" brand roti canai, made in Penang, Malaysia. Highly reconmended
Photobucket

Monday, August 17, 2009

Ravioli with Mushroom Red Sauce (Quik and Easy Meal)

Photobucket

I always keep something for quick and easy meals in my fridge, so in case when I come home late from work we can have something in fast for our dinner. (Tom said: If I tried to cook, we'd have frozen burritos and canned peas.)

We bought a pack of grilled chicken with mozzarella cheese ravioli from Costco last week. Since I got home late today and was so tired from work, I decided to cook this lazy meal for our dinner tonight. It only took me 5 minutes of preparation, and 30 minutes for the cooking time.

Photobucket

I have also included a pasta/noodle machine in my wish list - so I will make my own version of ravioli from scratch one day! :-p (editor's note: Sounds like the kind of present we'd all enjoy! hehe!)

1. 1lb of grilled chicken with mozzarella cheese ravioli

2. Mushroom sauce
i) 1 tbsp olive oil
ii) 1 cup of chopped sweet onion
iii) 300g fresh whole white mushroom
iv) 1 can - 751g Hunt's Garlic and Herb spaghetti sauce
v) Some basil and parsley flakes (dried or fresh)
vi) some black pepper and salt to taste
vii) Some shredded mozzarella cheese and Parmesan cheese for topping

Steps :

1. Heat a sauce pan, add in olive oil.
2. Fragrant the chopped onion, stir in whole mushrooms. Cook for 2 minutes.
3. Pour in spaghetti sauce, bring to boil, add in basil and parsley flakes.
4. Simmer for 30 minutes, pepper and salt to taste.
5. Meanwhile, boil a quart of water, cook the ravioli for about 3~4 minutes or until it reach your desired tenderness. Drained and set aside.
6. When the sauce is done, top the mozzarella cheese and Parmesan cheese on the ravioli, scoop the mushroom sauce to the top of it.
7. Serve warm

Friday, August 14, 2009

Homemade White Bread (Pain de Mie)

Photobucket

I really love the fresh baking aroma from the oven spreading in my house. Plus a cup of fresh brewed coffee, oh gosh!! Just like being in the heaven! lol!!


I am a bit picky about the shape of my bread. I don't like the shape of the bread pan that came with my bread machine. Tom helped me to get a new square bread pan with lid from Amazon (editor's note: This is called a "Pullman Loaf Pan." You buy a slide-on lid to make the square "sandwich bread" loaves). Its weird, we had to order it online, we couldn't find it from the major supermarket or retailer stores here.

Photobucket

There are so many bread recipes out there. I am still new to bread making, so for safety, I started with a very basic white bread recipe (editor's note: This is technically called "pain de mie"). It turned out great! Cottony soft inside. I am glad that I have everything for a fresh and healthy homemade bread now. I was really concerned about consuming too much bread improver - a common ingredient for those bakery shop to make nicer looking or texture bread/bun. I don't have worry too much about this now. yay!!!

Here's my recipe I would like to share, it is really simple for a new bread baker. Try it out! :-)
(editor's note: Best "white bread" ever! Can't wait for raisin bread!!!)

For a 4" X 4" X 13" Bread Pan

1. 350~360ml fresh warm milk (100~110F) - volume is to be adjusted according to the moisture of the dough.
2. 1tbsp sugar
3. 1 pack (7g or 21/4tsp) active dry yeast
4. 40g butter - melted (I will add up to 60g in my next attempt as I like the taste of butter a lot)
5. 1 .5 tsp salt
6. 510g all purpose flour

For bread machine baker
1. Pour the warm milk in the pan, dissolve sugar and yeast in warm milk. Let is rest for 5 minutes.
2. Add in flour and salt, select dough function and press start.
3. Add in butter after 4 minutes of mixing.
4. I shorten the mixing and kneading process, I just let the machine run for 25 minutes.
5. After 25 minutes, turn off the power. You may rise the dough in the machine or remove it to a lightly greased bowl, cover with plastic film and rise for 1 hour in warm (85F) place or doubled in size.
6. Punch the dough down with your fist, divide to 3 or 4 portions. Let them rise for 10 minutes.
7. With a rolling pin, flatten the dough to approx. 4" wide, 12" long, roll it from short side like a swiss roll, place it in the bread pan. Repeat the same to the rest of doughs.
8. Cover with plastic film, let it rise for another 45~60 minutes, or until it is 90% up the way to the top of the pan.
8. Bake with lid on at preheated oven (350F) for 35~38 minutes.
9. Once its done baking, remove the bread from the pan immediately and cool it on a wire rack.

For hand kneading baker
1. Dissolve sugar and yeast in warm milk in a large mixing bowl, let it rest for 10 minutes.
2. Add butter and flour into yeast mixture, stir until well it form a dough. Turn dough out to a floured surface.
3. Knead until smooth and elastic (about 10~15 minutes)
4. The rest of the steps will be same as machine baker #5~#9.

Ready to bake!
Photobucket

Fresh from the oven!
Photobucket


Monday, August 10, 2009

Pan Fried Asam (Tamarind) Prawn - (家常菜-干煎亚叁虾)

Photobucket
I can easily finish a whole plate of asam prawn with sambal belacan condiment. No kidding, if I'm not worried about the high cholesterol, I will cook this meal a lot.

I like to eat at home, I like the feeling of our family having meals together even though it may be just a very simple home cooked meal. It is not about the food, it is all about the feeling of a family being able to gather together. Back when I was kid, my parents were so busy on their noodle stall, they operated the business in the morning and night in order to keep us well fed and educated. That was a hard time. Sometime, my mom would just cook a big pot of rice, then serve everyone with a piece of over easy egg, seasoned with few drops of soy sauce and sesame oil. Simple enough, but I love the taste. Even now, I will still make this for my lunch box for work sometimes.

Photobucket

Prawn meal was not always available back then as we couldn't afford it. So, when my mom cooked this asam prawn, we would count how many prawn were in the plate and split it equally between us. LOL!!! This is one of my childhood memories.

Here's the recipe for the pan fried asam prawn.

A)
1. 350g prawn - trimmed and de-veined

B) Marinate sauce
1. 20~25g asam paste
2. 2~3 tbsp of water
3. 1/8tsp of sugar or to taste
4. 1 tsp soy sauce or to taste
5. 1 tsp oyster sauce

6. 1/2 dark soy sauce for cooking (optional)

Steps :
1. Mixed the marination ingredients #1~#5 in a container.
2. Rub in fresh prawns, marinate for at least 3 hours or longer for better flavor. Refrigerate.
3. Grease a heated frying pan, add in prawns. Keep the asam marination for later use.
4. Pan fry the prawn until they turn in pink color.
5. Add in dark soy sauce (optional)
6. Pour in the asam marination and continue to cook until its almost dry out.
7. Serve with sambal belacan condiment.

Saturday, August 8, 2009

Summerberry Muffin

Photobucket

It has been a busy week. Didn't get the chance to bake or cook. Its good though, our stomachs needed to take a break after so many heavy meals recently.

I was thinking to bake some mixed berry stuff as I have all kinds of berries sitting in my refrigerator - I use them for making my smoothies every day. My first thought was to bake a mixed berries sandwich cake, but the heat here makes me too lazy to move, so here I come with my simple summer berry muffin recipe. Its a fast and easy bake. Hope you like it.

Photobucket

Ingredients :

1. 180g all purpose flour
2. 50g sugar
3. 2 tsp baking powder
4. 1/4 tsp salt
5. 2 eggs
6. 55g butter - melted
7. 175ml fresh milk
8. 1 tsp vanilla extract
9. 1/2 tsp fresh grated lemon zest
10. 180g fresh or dried mix berries
( I mixed up with 1 ripe strawberry - cut to small cubes, some raspberries - cut to smaller cubes, some blueberries)

Steps :
1. Preheat the oven at 400F/200C
2. Sieve all the dry ingredients into a mixing bowl.
3. In another bowl, whisk the eggs until blended.
4. Add the melted butter, milk, vanilla and lemon zest. Stir to well combined.
5. Make a well in the dry ingredients, and pour in the egg mixture.
6. Stir the batter with a spatula just until the flour is moistened, not until smooth.
7. Fold in mixed berries.
8. Scoop the batter into the muffin cups.
10. Bake for 20~25 minutes.

Sunday, August 2, 2009

Mexico Bun - Water Roux (汤种) Starter Bun Dough

Mexico Bun
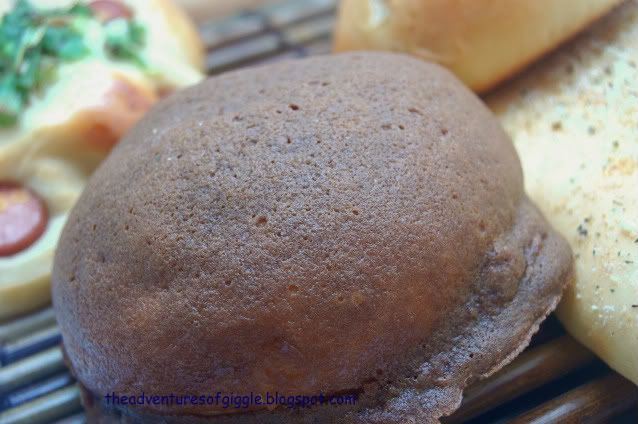
Don't ask me why is this call Mexico Bun. I believe all the Mexican people here have no idea what is this. I have not seen this bun been sold in the bakery shops here, where the place closer to Mexico. Weird huh?? LOL!!

In order to get the best result of my bun making (softest and longer lasting freshness), I keep trying out different kind of dough recipes, I believe that by trial and error, I will improve the technique and knowledge of the dough handling.

I have learned about this water roux (汤种) long time ago. Today, I finally got the chance to try it out, I think I have found the best sweet bun dough so far, you may use the same dough for savory filling or topping, the texture and softness of the buns are exactly the same you could get from the bakery shop.

Photobucket

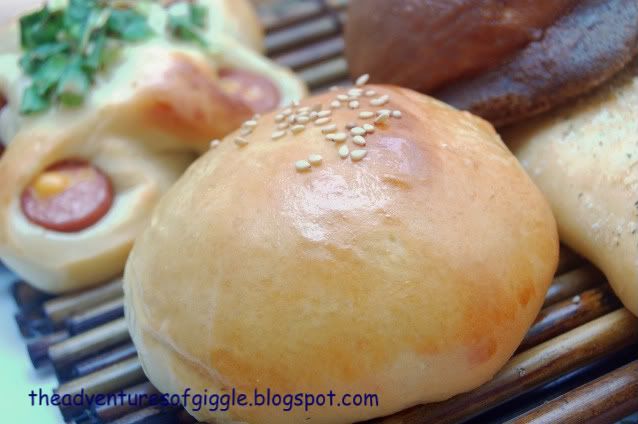
Besides Mexico Bun, I also made some BBQ pork bun with the left over filling from the char siu bao I made the other day. Of course, can't miss hot dog onion buns too, it's our favorite now. lol!! Please refer to my older posts for the filling/topping recipe of BBQ pork, Parmesan Oregano sticks and Hot Dog Onion. I will only post the dough making and Mexico bun topping recipe in this post.

Photobucket
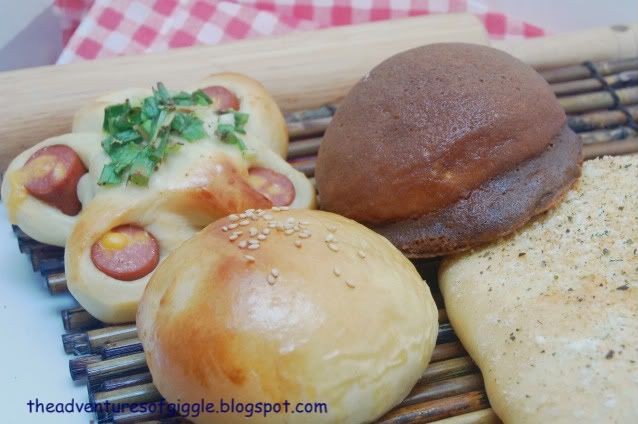
Assorted bun again...

The making of the water roux is not as complicated as I thought. Following are the recipe and steps I would like to share, please try it out and see if this is the one you have been long looking for.


A) Water Roux Starter (make 125g starter)
i) 25g bread flour
ii) 1/2 cup water (approx. 150ml or 125g)
** The ratio (based on weight) of the flour and water should be 1 : 5 **
Steps of making water roux starter :

1. Mix the flour and water in a non-stick sauce pan until well blended (lump free).
2. Cook it over medium low heat (stir continuously) until the mixture reaches 65C (approx. 149F).
3. Remove the pan from heat immediately, cover with plastic film and let it cool to room temperature.

** If you don't have the thermometer to measure the mixture while cooking, the estimated cooking time is about 2~3 minutes, the mixture should be thicken by then (the texture is like the egg and flour mixture of sponge cake batter). **
Photobucket
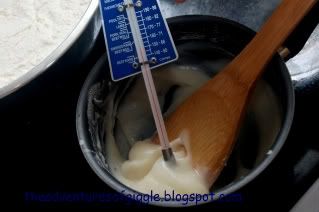
Temperature and texture of the water roux.

B) The Bun Dough Ingredients :

i) 350g bread flour
ii) 100g all purpose flour
iii) 35g milk powder
iv) 55g sugar
v) 1/2 tsp salt
vi) 10g instant yeast.
vii) 2 egg(100g) - lightly beaten.
viii) 135g water
ix) 45g unsalted butter


Steps (I tried my best to describe the process with the bread machine method and hand kneading method) :

1. Sieve together all the dry ingredients except yeast.
2. For bread machine user, pour in ingredients in sequence - water, egg then flour mixture.
3. Form a small well (not too deep to the liquid ingredients), add in yeast.
4. Select the dough function and press start.
5. After 5~6 minutes of mixing (the mixture should be crumbly now), add in water roux starter.
6. About 15 minutes later, add in butter and let the machine continue to run.
7. The whole mixing and kneading process is 30 minutes.
8.This time, I let the dough rise in the machine for 1 hour after it stopped kneading. Due to the dry weather here, I placed a damp tower on top of the bread pan, and cover with lid.
9. Alternatively, you may remove the dough from the machine, and rise in a lightly greased mixing bowl, cover the bowl with plastic film, rise at temperature 78F/28C for 1 hour.
10. After one hour, test the dough by poke it down with your finger, if it does not bounce back, means that you are ready to go, otherwise, rise until it reaches the condition.
11. Punch down the dough with your fist to deflate the gas.
12. Divide it to your desired portions, roll each of them to a round ball.
13. Let them rest for another 10 minutes, then you can go ahead to shape what ever buns you like to make.
14. After shaping, let the buns rise for another hour at temperature 100F/38C. For most consistent results, I let them rise in an un-heated oven, put a bowl of boil water in the oven, close the door and let it rise until last 15 minutes, remove the buns and water when you preheat the oven.
15. Bake according to your recipe's instruction.
16. After its done baking, once you remove the baking sheet from the oven, transfer your buns to the cooling rack immediately, This is one of the IMPORTANT steps, as the heat of the baking sheet will make the bottom dry and hard.

For hand kneading baker :1. Sieve together all the dry ingredients on your working surface.
2. Make a small well in the middle of the flour mixture, slowly add in water, egg and water roux starter.
3. Knead for about 15~20 minutes, add in butter and continue to knead for at least 30 minutes. (To test if the dough has been kneaded enough, stretch a little of it, it should not tear off easily and looks translucent).
4. Place the dough in a lightly greased mixing bowl, cover it with plastic film, rise at 78F/26C for 1 hour.
The rest of the steps are the same as machine method - steps # 10~13.


C) Mexico Bun

1. Filing - 10g butter cube for each bun.

2. Topping :
i) 70~75g all purpose flour 70g first, add extra if necessary - I like it thicker, as it will create crispier topping after baking)
ii) 60g salted butter - soften in room temperature.
iii) 65g sugar
iv) 1 tsp coffee paste
v) 1 tbsp (add extra if you wish to have stronger taste) instant coffee dissolved in 1 tbsp water


Steps :
1. Whisk the butter and sugar until well blended.
2. Stir in coffee paste and liquid, mix well.
3. Sieve the flour into the mixture (sieve 70g first, add extra if the mixture is too runny, I like it thicker as it will result crispier topping after baked).
4. Stir to well combined (lump free). Refrigerate until needed.
5. Scoop the mixture into a icing piping bag.

Steps to make the buns :
1. Flatten the ball (the small dough portions that have been rested for 10 minutes), place a cube of butter in the middle, pinch and seal the edge.
2. Let the the buns rest for 1 hour.
3. Pipe (squirt on with cake decorating tube) the coffee mixture on top of the bun in a swirl pattern.
4. Bake at 375F for 12 minutes. (Different oven will give different result, I adjust it by trial and error, this is the best temperature and timing for me).
5. Remove the buns from the oven and transfer them to the cooking rack.

Photobucket
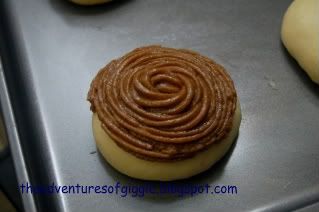
Mexico Bun before baking.
Related Posts Widget for Blogs by LinkWithin