Showing posts with label chicken. Show all posts

Monday, October 31, 2011

Quick and Easy Chicken Noodle Soup

Photobucket

I didn't have to cook for a couple days as we have too many leftovers to clear out. Now its time to clear some raw ingredients out of the fridge. Quick and Easy Chicken Noodle Soup - clear out my celery, onion, carrot and potatoes and chicken breast. Marinate the chicken breast with some zesty herbs, pan fry then, shred and set aside. In a different pot, boil water, dump chopped celery, onion, carrots and potato, add some ground pepper, cook for 30mins or until carrots are tender, add shredded chicken, cook over low heat for about 15 minutes, add cooked spiral pasta, salt and chicken bouillon to taste. DONE!!! 这真是个消灭掉一堆中国芹菜的好方法啊!又快又容易, 昨天办公室的pot luck, 红毛人很喜欢。

Friday, November 12, 2010

Confinement Food - Varity Nutrition Soup for Wk#1, 月子餐 - 第一周-各类补汤

Photobucket

Forgive me for the inconsistency of my photo quality recently. The time is approaching - it is just around the corner - trying to post as many things as I can. But it doesn't work so well for a clumsy pregnant woman.

After getting advices from elderly women and reading some articles about confinement food, I have come up with a few choices of nutritional soup for my first week's confinement. It is not recommended to consume meals cooked with alcohol (even wine) and sesame oil in the first week post-partum because it will lead to unfavorably high vaginal blood discharge (恶露). The meals for the first week should be balanced, neutral and nourishing.

Here I came up with 3 types of nutritional soup first. I will update more whenever I have chance. It has been really exhausting recently, so I am trying to catch some rest. I would appreciate if some of you could share some tips with me about your confinement experience too.

大肚婆临盆在即, 动作迟钝, 没花什么心思拍照片了, 有拍到交货就好了啦! 照片品质不好, 请大家多多体谅哦...又要采购, 又要试煮, 又要记录食谱, 又要更新网志, 又要在生产之前赶工作进度....累啊!!!

今天先来几道温和的补汤, 还有一些要等以后有机会再整理了...目前争取时间休息最重要.

听 了一些过来人的意见和参考了许多医疗书籍, 结合了老人家的传统和医学上的资料, 我整理了几道产后第一周所要喝的补汤. 根据书上说的, 产后第一周的重点在於排除恶露, 除了服用生化汤, 饮食方面以均衡清单为主, 由于酒精会使血管广张促进血液循环, 而使出血更多, 所以饮食不加酒禁麻油为宜, 中药补汤也需要等到第二或第三周开始. 老人家说的, 第一周要"温补". 以下几款补汤其实也适合在平时褒来補一補, 做法简单, 是属于比较温和的補汤, 不会燥热. 还有其它补汤等我有机会在UPDATE吧, 大肚婆超忙的!!!

月子餐尽量少盐, 要不然水肿消不掉哦! 自己也是在学习, 也恳请有坐月经验的读者们多多留言分享, 感激不尽哦!!!

Photobucket
Soup # 1. - Mushroom & black fungus chicken soup - 香菇木耳鸡汤

1. 1/2 free range chicken chunks (approx. 600g), 半只土鸡(切大块) - pre-washed with boiled water, 川烫备用
2. 4~5 pre-soaked mushrooms - cut to chunks
3. 1" of fresh ginger chunk (can use bigger chunk if you like it)
4. 4~5 pre-soaked black fungus
5. 1 fresh oyster mushroom (sliced) - optional, can omit if it is not available.
6. Some wolfberries
7. 1000~1200ml water.
8. Salt to taste

Steps :

1. Boil the water, add in chicken and mushroom.
2. Bring boil again, simmer over low heat for approx. 40~60 minutes.
3. Add in black fungus, oyster mushroom slices, wolfberries.
4. Bring to boil again, simmer another 20 minutes.
5. Remove from heat, season with salt.

Photobucket
Soup# 2 : Black Bean Pork Rib Soup (黑豆排骨汤)

1. 400g Pork ribs (can substitute with pork knuckles chunks), pre-washed with boiled water, 川烫备用.
2. 2/3~1 cup black beans (wash and sauteed over medium heat (without oil/grease) until the bean's skin begin to crack), remove from heat and set aside.
3. 1" ginger chunk
4. 1200 ml water.
5. Salt to taste.

Photobucket

Steps :
1. Boil the water, add in ingredients # 1~3.
2. Bring to boil again, simmer over low heat for 80~90 minutes.
3. Salt to taste.

Photobucket
Soup# 3 : Chicken in Brown Sweet Rice Soup - 糯糙米汤炖土鸡
(recipe from Sister Lisa)

1. 1 cup (use rice cup) of brown sweet rice
2. 1400~1500 ml water.
3. 1/2 free range chicken chunks (approx. 600g) (1/2 只土鸡块), 川烫备用.
4. 6~8 Black dates/red dates 黑枣/红枣 (optional)
5. Salt to taste (can be omitted)

Steps :
1. Cook the sweet rice until it is the consistency of congee.
2. Separate the rice from the liquid. (I keep some rice)
3. Add in chicken chunks and dates
4. Bring to boil, simmer over low heat for 45~60 minutes.

Monday, July 5, 2010

Nasi Lemak (Rice with Coconut Milk) and Curry Chicken

Photobucket


OK, back to cooking posts now.

It is July 4th weekend, we have 3 days off. There is no more reason for me to be lazy and find all kind of excuses not to cook.. :-p

It is not fair to Tom too, he has been eating too much of my lazy meals recently, fried rice, noodle soup, koey teow soup, beehoon soup, mee suah soup, fried noodle, pizza...etc. I feel a bit guilty...lol

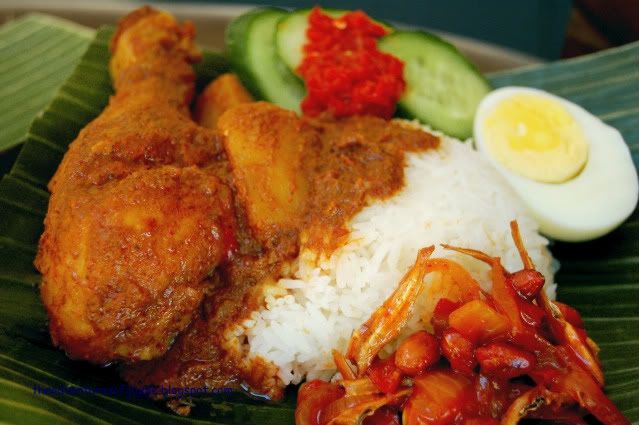
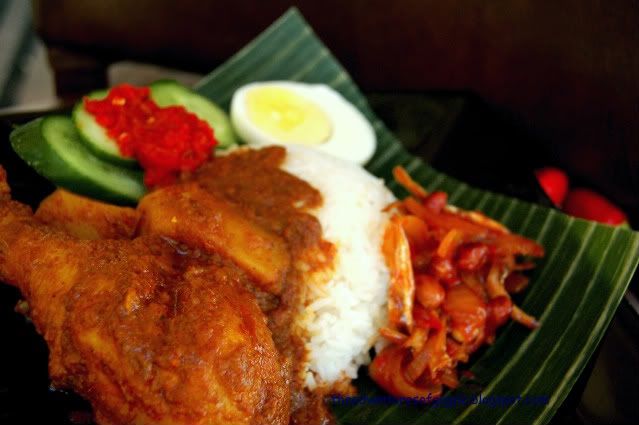
We have a small pot luck party on this weekend, they ordered curry chicken from me, I decided to cook some additional ingredients for nasi lemak (coconut rice)just for ourselves and some of my friends I recently met here - they are from Singapore and Malaysia.

Recipe for Curry Chicken

Please keep in mind that this recipe is for 5lbs of chicken, adjust the amount of the ingredients if you cook for smaller portion.
It is impossible for me to find the fresh ground spices over here in Arizona. Hence I have invented my own version of curry chicken, I don't really like the typical Chinese curry chicken that with a lot of coconut milk gravy. I like curry Kapitan but it is too dry for me, so, I mix with a pack of curry rendang paste in order to produce more gravy to mix with the rice. Here's my version of curry chicken.


1. 1.5 pack (110g) of Hup Long curry Kapitan powder (see picture at the end of the post), it is available at local oriental supermarket (Lee Lee), I normally buy it from Penang (Carrefour or Tesco).

2. 1 pack (200G) of Mak Nyonya Rendang paste (see picture at the end of the post)
I brought this from Penang too, you can substitute it with any brand that is available at your local oriental supermarket)

3. 5lbs chicken, marinade with 0.5pack(35g) of curry Kapitan powder with 1/2tsp of salt for 1 hour.

4. 500g purple shallot - ground or blended
5. 4 stalks lemon grass - crushed
6. 8~10 curry leaf
7. 1000~1200ml water
8. 3~4 tbsp thick coconut milk
9. 2~3 tsp lime juice
10. 2pcs of lime peel (about 2" size) - optional
11. Salt to taste
12. 2~3 potato, cook until soft, peel and cut to chunks.

Note :
*** If I cook 1 whole chicken - approx. 3.5lbs, I will just reduce the Kapitan curry powder to 1 pack usage, reduce the water and coconut milk, I will keep the same amount of ground shallot.***

Photobucket

Steps :

1. Heat the pot, add in sufficient oil.
2. Quick fry marinated chicken
- Not to well cooked. About 2 minutes for a whole drum stick, less than 1 minute for the rest of cuts. I know this step may not sound healthy, but it prevents the meat from becoming mushy. And it makes the meat coat better with the curry gravy too. Split to few fries if you want to save the oil.

3. After quick frying the chicken, discharge excessive oil. Leave about 3tbsp of oil in the pot.
4. Fragrance ground shallot for about 5 minutes (adjust the heat if necessary), add in lemon grass, curry Kapitan powder (pre-mixed with some water), rendang paste and curry leaf.
5. Stir and fragrance for another 5~8 minutes.
6. Add some water water (I added 800ml first, then followed by small portion until it reached my desired texture, if you like thicker gravy, reduce the amount of water)
7. Bring to boil, add in pre-fried chicken, pre-cooked potato chunks. Simmer about about 10~15 minutes or until the chicken is tender.
8. Add in coconut milk, lime juice, salt to taste.
9. Bring to boil again then remove from heat immediately.
10. Add in lime peel - optional (I like it this way as it brings some tangy aroma to my curry chicken, the lime peel shouldn't be cooked, or it will bring bitter flavor to your curry gravy ).
11. Skim excessive oil if necessary.


Photobucket
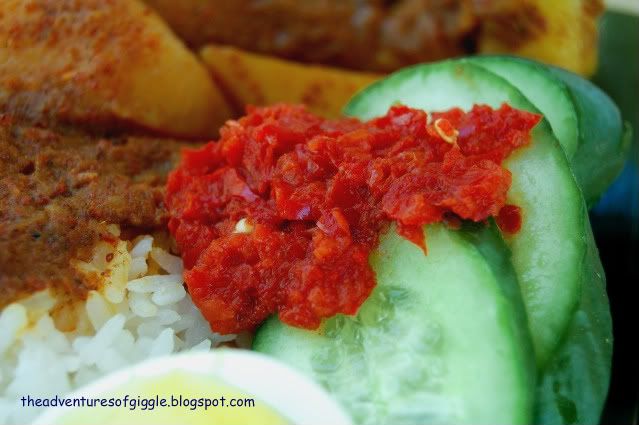
Sambal chili- I made this 1 day ahead and forgot to record the volume of my ingredients. I believe a lot of Malaysians have their own homemade recipe. I made it simple just a combination of fresh ground chili, roasted prawn paste (belacan) and key lime juice.


Photobucket

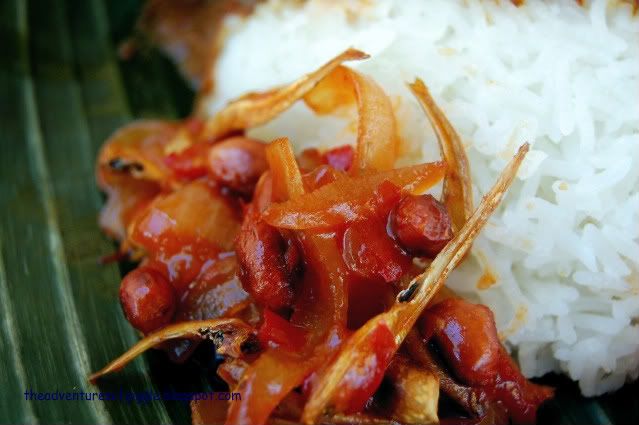
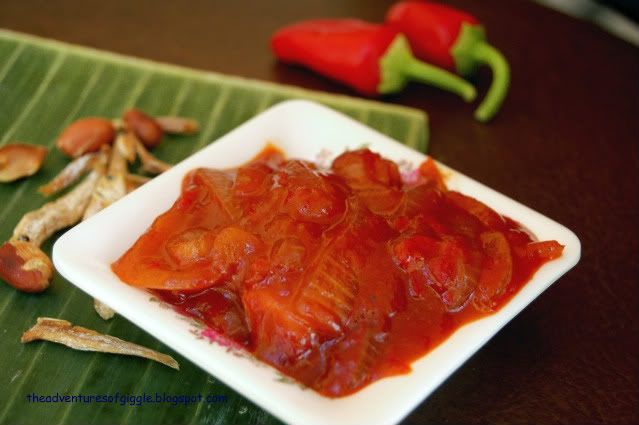
Sambal Ikan Bilis (Sambal Anchovies and Peanut)- only mix the sauce with anchovies and peanut when serving to avoid soggy texture.

I make this for small portion only just for ourselves and my friends from Malaysia and Singapore)

1. 100g anchovies - rinsed then dried with paper towel, bake in the oven for 25~30 minutes at 300f. Juggling the baking sheet every 10 minutes to prevent burning. I avoid to deep fry it for health reasons (try to avoid too much frying now..lol)

2. 150 peanuts - saute without oil until golden brown (again, avoid frying it)

Sauce for ikan bilis

1. 1tbsp oil
2. 100g onion slices
3. 2tbsp homemade sambal chili
4. 2 tbsp sweet chili sauce
5. 1 tsp oyster sauce
6. 70ml water
7. 1~2 tbsp tamarind juice
8. 1/2~1 tsp dark soy sauce
9. 1/2 tsp sugar
10. Some corn starch liquid for thickening
****no need to season with salt because anchovies are salty enough****

Photobucket

Steps:
1. Fragrance onion slices with oil.
2. Add in sambal chili, stir and switch to medium heat.
3. Add sweet chili sauce, oyster sauce and dark soy sauce.
4. Stir for few second then add in water, tamarind juice and sugar.
5. Bring to boil then thicken the sauce with corn starch liquid.
6. Remove from heat immediately.

Lastly...coconut rice, just grab all the ingredients below into a rice cooker then press start. :-)

1. 3 cup jasmine rice - washed and rinsed.
2. 2.75~3 cup water (depends on which brand of the rice you use)
3. 5~6 tbsp thick coconut milk
4. 1/4 tsp salt
5. 1 inch of fresh ginger chunk
6. 6~8 pandan leaf (screw pine leaf) - I like it more-- :-)

************************************************************************


Curry Kapitan powder - it is also available at oriental supermarket here - Lee Lee Supermarket.


Brought it back from Penang, I found it tastes better. The one sold at Lee Lee is the brand from Singapore.

Tuesday, September 29, 2009

Dong Gui (Angelica sinensis) Chicken Soup

Photobucket
I am being overloaded - feel really exhausted. I am working a few extra hours per day for the past 2 weeks(wanna save some flexible vacation hours for my days off to go back to Penang at the end of Nov.) I need some energy enhancement food - tadahhhhh -I need some energy enhancement food - tadahhhhh - Dong Gui (Angelica Sinensis) Chicken Soup. I didn't put too much Dong Gui as I wasn't sure Tom would like it or not, fortunately, that was not too hard for him to accept it.

Photobucket

Here's my very simple energy soup.

1. 12g Dong Gui slices (add more if you like it tasted stronger)
2. 1lbs chicken (I used drum sticks as they were available in my fridge)
3. 500ml water.
4. 3~4 dried dates - un-pitted
5. Some wolfberry
6. Few slice of Yok Chuk (Polygonatum odoratum) - optional
6. Salt to taste

1. Gather everything except salt into a double boil dish.
2. Cook for 3~4 hours.
3. When done cooking, skim the excessive oil if necessary.
3. Season with salt before serve.

Thursday, July 16, 2009

Clay Pot Chicken Rice (煲仔鸡饭)

Photobucket

I have some chicken leftover from making sizzling noodles. It can be used for clay pot chicken rice too. The ingredients and steps of the chicken and gravy are the same. You may refer to my sizzling noodle post. I will just post the steps of cooking the rice with other ingredients here.

Photobucket


A) Chicken & Gravy
1) 2 pieces of chicken chunks and some gravy (please refer to sizzling chicken noodle post)

B) Rice
1. 1/2 cup of rice for a small clay pot - washed and pre-soaked in water for an hour
2. 1/2 cup of water, save some extra hot water.

C) Other ingredients
1. Few slices of Chinese sausage (腊肠)
2. 1~2 chunks salty fish
3. 1 egg
4. Some sesame oil
5. Some green onion or Chinese celery for garnishing

Steps :

1. Boil the rice and water in a clay pot, simmer with cover on for 2~3 minutes over medium low heat.
2. Add in salty fish chunks, cook for another 1 minutes.
3. Scoop in chicken and gravy, continue to cook for 2~3.
4. Add in sausage slices and egg, cook for 2 minutes.
** Be careful to adjust the heat, sprinkle some extra hot water if needed**
5. Drop some sesame oil, garnish with some green onion or celery when serve.

Tuesday, July 14, 2009

Sizzling Chicken Noodle (铁板面)

Photobucket

My friend in Penang complained that I should have posted more Asian recipes. Eerrr?? I think I have been posting more Asian recipes..dear :-P

Tom bought me a cast iron sizzling pan few months ago. I like to serve my food in a clay pot or a sizzling pan because they keep your food warm longer. I especially like pipping hot. :-p

I like to order sizzling noodle if I dine in at the food court inside the shopping mall. I can say it is available in every shopping mall? It is because I seldom find a good noodle stall operate in the food court. If the sizzling noodle served to me is not good, I could just simply add in soy sauce and chili to "cure" them and it won't tasted too bad since the noodle served warm with the sizzling plate.

Photobucket

It is not difficult to make sizzling noodles on your own, here's my recipe and direction. Hope you like it. :-)


A) Noodle for 3~4 people.
1. I use ramen noodle - cook to about 80% doneness, as it will be cooked again on the sizzling pan. You can substitute ramen with Yi Mee.
2. 3~4 eggs
3. Some green onion or cilantro for garnishing.

B) Chicken
1. 600g boneless chicken leg meat - marinate overnight with :
i) 1tbsp soy sauce
ii) 1 tbsp oyster sauce
iii) 1/2 tsp dark soy sauce
iv) 1 tsp sesame oil
v) 1/4 tsp white pepper
vi) 2 cloves garlic - crushed
vii) few ginger slices

C) Gravy
1. 2~3 cloves of garlic - minced
2. Few ginger slices
3. 1 tsp soy paste (normal or spicy)
4. 3~4 dried chili - unseeded, pre-soaked
5. 2~3 dried mushroom - pre-soaked, sliced then rub with some sugar (a trick to make the mushroom more springy)
6. 250~280ml water.
7. 1 tsp oyster sauce
8. 1/2 tsp dark soy sauce
9. A pinch of sugar or to taste
10. Salt to taste
11. 1 tbsp spoon corn starch mix with 2 tbsp water to thicken the gravy.

Steps :

1. Heat and grease a frying pan.
2. Fragrant garlic and ginger slices.
3. Add in soy paste, dried chili, mushroom slices, stir for about 20~30 seconds, watch out the heat, don't burn the ingredients.
4. Stir in marinated chicken, cook for about 4~5 minutes.
5. Slowly pour in water, bring to boil.
6. Add ingredients C7~C10, thicken the gravy with corn starch liquid.
10. Remove from heat and set aside.
11. Heat up the slightly greased sizzling pan (about 2~3 minutes).
12. Add in noodle, immediately, scoop the chicken and gravy to the sizzling plate, cook for about 1 minutes.
13. Slightly stir the noodle to coat well with the gravy.
14. Add in egg, for another 30~45 seconds or the egg reach your desired doneness.

Thursday, May 14, 2009

Chicken Fajita

Photobucket

Fajita is one of the Tex-Mex cuisines, which also can be referred as Southwestern cuisine in America. Tex-Mex cuisine refers to the food prepared with the influences from Texan and Mexican cuisines.

There are a lot of Mexican restaurants in Arizona. The most popular Mexican dishes they serve are Taco, Burrito, Fajita, Chimichanga..etc. Most of these dishes have a common ingredient - they are served with tortilla wrapped or folded. The fillings normally consist of grilled meat, lettuce slices, re-fried beans (frijoles in Spanish), salsa, guacamole, sour cream..etc.

Photobucket

The name Fajita originally refers to grilled beef (skirt steak) served with tortilla. Different kinds of meat like Chicken, pork and shrimp are also available now. The grilled meat is usually served on a piping hot iron skillet/sizzling plate with some pepper and onion slices. The tortilla sheets and other condiments are served on a separate plate.

Photobucket
Tom bought me a sizzling plate a month ago. I was hopping to make my own version of fajitas. Here they are. :-)

1. 250g chicken breast

Marinate with :
1. 1/4 tsp ground cumin
2. 1 tbsp lime juice
3. 5~6 leaves of fresh oregano (minced) or 1/2 tsp dried oregano flakes
4. 1/2 paprika pepper powder
5. 3 cloves garlic - crushed
6. salt to taste.

- marinate overnight.

1. Some red and green pepper slices
2. 1 jalapeno pepper slices
3. 1 habanero pepper slices (only for those SUPER HOT lover)
4. Some Cilantro (optional)

Other ingredients/Condiments :
1. 4~6 tortilla sheets
2. Lettuce slices
3. Salsa (see recipe here)
4. Guacamole (see recipe here)
5. Re-fried and some shredded Mexican cheese

Cooking Steps :

1. Grill the chicken breast over medium heat (about 8~10 minutes each side). Remove from heat, and slice to strips.
2. In the meantime, warm the tortilla sheet and re-fried bean topped with Mexican cheese.
2. Heat the greased iron skillet/sizzling plate, saute the pepper and onion slices for about 3~5 minutes. Season with some salt and garlic if desired.
3. Add in chicken strips, stay in the heat for about 2 2~3 minutes.
4. Remove from heat, and serve warm.

Saturday, April 25, 2009

BBQ Chicken

BBQ Chicken

Back to 1980's~1990's, whenever someone had a party for a special occasion, they liked to have BBQ, grilling the chicken, corn, sweet potato and "kembung" fish with the charcoal heat. The host and guests took their time hanging around at the party by BBQing and talking or playing games. Those were a greatly cherished moments.

People now are lack the time or afraid it's too much trouble to prepare the food and clean up the mess, they prefer to have a caterer to get everything done, or celebrate at the restaurant.

Photobucket

My family always have BBQ party for certain occasions like Lantern Festival or Moon Cake Festival. Usually , chicken wing is first choice. It is always in short supply due to eating is faster than grilling. LOL!!

Here's our recipe for the BBQ chicken.

1. 2lbs chicken (about 6 chicken drum sticks)

Mix the following marinating ingredients in a mixing container.

A)
1. 1/2 tsp fresh grated ginger
2. 3~4 cloves garlic - crushed
3. 3 tbsp soy sauce
4. 1 tbsp oyster sauce
5. 1 tsp sesame oil
6. 1.5 tsp dark soy sauce
7. 1/4 tsp sugar
8. 1/8 tsp ground white pepper
9. a dash of 5 spices powder (五香粉)

B) Some butter and honey for brushing

Steps :

1. Rub the chicken pieces with marinating sauce to coat well. Refrigerate overnight, turn once for better marinating.
2. Place the chicken piece on the grate of the preheated grill. Grill over medium heat with lid covered for 10~12 minutes each side for drum sticks (reduce to 7~8 minutes each side for other portions).
3. Before you remove the pieces from the grill, brush the butter followed by honey on both sides.

Monday, April 6, 2009

Tandoori Chicken

Photobucket

I am lucky, having being grown up in a country that consists of a multi-racial environment. This special condition not only makes us able to blend well in different cultures, but also provides us varieties of foods to explore anytime, anywhere across the country. It is also interesting that you get the opportunity that to learn different kinds of culinary styles from your neighbors.

Tandoori Chicken is a Punjabi dish that originates from North India. I think it is served in most every Indian Restaurant. The word - " Tandoor" - is a cylindrical clay oven used in cooking and baking. The chicken is normally marinated with yogurt mixed with Tandoori Masala (a mixed ground spices of cumin, coriander, pepper, ginger, cardamom, mustard..etc), then baked in the high temperature tandoor, or it can be also cooked on a traditional grill.

Photobucket

The Tandoori Chicken served in Malaysia usually comes with a mint yogurt condiment. This refreshing condiment makes an appropriate compromise for the strong Tandoori flavor. There is one thing I don't like about the Tandoori Chicken made at most restautants is - the chicken comes out too dry and too red (I think it is not from the red chili -probably red food color instead??)

So, when I make the tandoori chicken by my own, I lower the baking temperature a bit, so my version of Tandoori Chicken is without food color and always yummy and juicy!

Ingredients :

1. 4pcs chicken leg (4pcs) - cut few deep lines on both sides for better cooking.
2. 5 cloves garlic - crushed
3. 1/2" ginger - crushed
4. 2 tbsp lime juice
5. 8 tbsp plain yogurt
6. 5~6 tbsp Tandoori Masala (buy from a well stocked supermarket or Asian/Indian specialty food store, andadjust to your desired spiciness)
7. 1-1/3 tsp salt
8. Some soften butter (optional)

Mint Condiment
1. 2 tbsp plain yogurt blend with 8~10 mint leaves.


Steps :

1. Rub the chicken with the crushed garlic, ginger and lime juice. Set aside for 15 minutes.
2. Mix the yogurt, tandoori masala and salt well.
3. Rub the tandoori yogurt mixture on the chicken until evenly coated. Refrigerate for at least 4 hours or overnight.
4. Leave the marinated chicken at room temperature for 1~2 hours before cooking.
5. Preheat the oven at 425F/220C, place the chickens on the middle rack. Put the chicken on a wire cooling rack, on a baking sheet. This will elevate the chicken above the baking sheet, making sure it cooks evenly, and catches the drippings on the baking sheet. Bake for 30~40 minutes for each side. Turn once or twice.
6. 10 minutes before the end of baking, brush some softened butter on the chicken and return to baking.
7. Serve warm with cool mint condiment.

Monday, March 23, 2009

Easy Chicken Wrap

Chicken Wrap

When I feel too lazy to cook, a chicken wrap is always the first choice that comes to my mind. It is a quick and easy meal. I used to have some marinated chicken breast in my fridge for a quick meal like chicken wrap, fried rice or noodle, and easy spaghetti. I have a variety of types of seasonings kept in my pantry. I don't have any particular flavor for the chicken wrap, just mix and match with some seasoning I have in my pantry.

Chicken Wrap

Ingredients and Steps :

1. 280g boneless and skinless chicken breast. - cut to bite size strips, marinate for at least 3 hours with some salt and garlic powder, paprika powder, lemon zest, thyme and parsley flakes. You may make your own flavor chicken strips according to your preferred seasoning - it is flexible.

2. 3pcs of burrito size tortilla
3. Some chunky salsa - see recipe here
4. Some warmed re-fried bean (optional)
5. Few lettuce leaves
6. Some lettuce head shreds.
7. Some shredded cheese (optional)

Steps :
1. Pan fry the chicken strips in a slightly greased saute pan.
2. Cover the tortillas with aluminum foil, warm in the preheated (250F) oven for 3~5 minutes.
3. Place a lettuce leaf on tortilla, top with cooked chicken strips, shredded cheese, re-fried beans, chunky salsa, lettuce shreds.
4. Roll/fold up.
5. Serve with some tortilla chips and salsa. Enjoy!!!

Some seasoning in my pantry.. , re-fried beans
Chicken WrapChicken Wrap

Warmed tortilla, ready to roll/fold!!
Chicken WrapChicken Wrap

Sunday, March 8, 2009

Chicken Cordon Bleu

Photobucket

What is the meaning of Cordon Bleu? I asked Tom when I first saw this dish on the menu in a restaurant. He told me that it is the name of a culinary school. Cordon Bleu is a French word, means "blue ribbon", which was referred to the apparel of the knights in France back to 15th century.

And what is that chicken related to cordon bleu? Umm..... I couldn't find the right answer. It might be a dish that invented by a chef in the Cordon Bleu culinary school. The history of Chicken Cordon Bleu is a little vague, some people said it was invented in the United States, and some said it was developed in Europe.

Photobucket

Anyway, traditionally, it is a piece of chicken breast stuffed with cheese (Swiss or Gruyere) and sliced ham. Then the stuffed breast is coated with bread crumbs and either pan fried or oven baked.

I have made this dish several times with aged Swiss cheese. I never had aged Swiss cheese before, got that accidentally because the shop was running out of the normal type. For those huge cheese fans, aged cheese is one of the best. I couldn't handle the strong taste of aged cheese, but Tom and Cici love it very much.

Photobucket

After finishing the pack of the aged cheese I got, I made this dish with the newly bought normal Swiss cheese yesterday. I could handle it much better than before. So, if you are the beginner to the taste of cheese, don't cook this with the aged cheese, it will be like an American eating "stinky tofu" 臭豆腐.

Ingredients :

1. 2 pieces of chicken breast halves.
2. 1/2 tsp parsley flakes
3. 1 tsp garlic salt
4. Some black pepper (optional)
5. 2 slices of swiss/gruyere cheese
6. 2 slices of cooked ham ( I used honey ham or turkey ham)
7. 1/3 cup of seasoned bread crumbs


Steps :

1. Pound the chicken breast with meat mallet to 1/4" thick piece. I don't have the meat mallet, so I sliced the breast with knife to a thinner butterfly piece.
2. Season the chicken breast (both sides) with garlic salt and parsley flakes. Refrigerate overnight.
3. Preheat oven to 350F/175C
3. Place a slice of cheese and a slice of ham on top of each chicken piece.
4. Roll up each piece and secure with 2~3 tooth picks.
5. Coat each stuffed chicken evenly with bread crumbs.
6. Place the chicken on a cooling rack that sitting on top of a baking sheet.
7. Bake for 30 ~ 35 minutes or until the meat is no longer pinky.
8. Remove the tooth picks and serve immediately.

Butterfly slice -> Roll -> Tooth picks secured -> bread crumbs coated - > ready to bake!!
PhotobucketPhotobucketPhotobucket

PhotobucketPhotobucket


Wednesday, March 4, 2009

Turmeric Chicken Rice

Photobucket

Turmeric is widely used in Asian culinary dishes. It is a significant spice in curry powder/paste, and also many others South Asia traditional foods. It is thought to have many medicinal properties. I have learned from my home country that Malay women will drink pure fresh turmeric juice during the month of confinement after delivering a baby, I know that many Chinese ethnic women in Malaysia practice the same too, for gastrointestinal discomfort relief.

Many people like to use it in dried powdery form, which is more convenient for your food preparation. I like to use fresh turmeric (just like I like fresh ginger,) even though there is more work to be done.

My mom used to cook turmeric chicken when I was little, and I always ended up eating 3 bowls of rice whenever she cooked this dish. I liked to mix the sauce with rice, add some soy sauce, then finish all the rice first and leave the chicken to be the last thing to be eaten - save the best for last!! LOL!!

I was hesitant the first time I cooked this dish for Tom and Cici. I wondered if they could handle the smell and weird yellow color of the turmeric sauce. I didn't mix the sauce and rice for them the first time, I just told them that it would taste better if they follow my directions, and they gave me a very good response.

Please don't be afraid when you have yellowish finger nails or cooking ware when you prepare this dish. They can be washed out in within a day or two, and this delicious dish is worth the mess!

Here's the recipe.

1. Chicken (preferred leg or wing) - 2lbs (about 6 chicken drum sticks)
2. Cooked rice for 5~6 people

Marinating Ingredients :

1. 55g fresh turmeric, pound to mashed
2. 90g minced shallot
3. 1/4 cup soy sauce
4. 3tsp dark soy sauce
5. 2tsp sugar
6. 2tsp sesame oil
7. 1 table spoon oyster sauce
8. 2/3 tsp white pepper

Some extra sesame oil, soy sauce and white pepper for the rice.


Steps :

1. Cut a line on both sides of the drum sticks.
2. Mix the minced shallot with turmeric mashed, pounding to mix well.
3. Combine all the marinating ingredients in a container.
4. Rub the chicken pieces until evenly coated.
5. Refrigerate overnight, turn once for evenly marinating.


Cooking :

1. Grease and heat up a non-stick pan, place the chicken pieces on the pan, and cook in low medium heat, adjust the heat accordingly to prevent burnt meat. Cover with lid for faster cooking.
2. Cook about 8~9 minutes per side for drum stick, the cooking time for the others cut should be shorter.
3. When the chicken is done, remove them from the pan.
4. Pour the left over marinating sauce into the pan, bring to slightly boil.
5. In low heat, add in the rice, stir to mix well, add some sesame oil, soy sauce and white pepper to taste. This process should be done in a about 2 minutes, don't over cook the rice. Serve warm.


Related Posts Widget for Blogs by LinkWithin